

Home Blog Wood Floor Repair Marker: Fix Scratches Instantly
Wood Floor Repair Marker: Fix Scratches Instantly

A fresh scratch on hardwood has a way of grabbing your eye every time you walk past it. For Richmond homeowners looking into hardwood floor repair or even full hardwood floor refinishing, a wood floor repair marker can be a smart first move, but only if you know where that fix starts and where it stops.
In a lot of homes in Richmond VA, the right marker handles a light scratch in minutes. The wrong marker, or the wrong repair on the wrong kind of damage, leaves you with a dark stripe, a sheen mismatch, or a bigger refinishing bill later.
Selecting the Right Wood Floor Repair Marker
The appeal of a wood floor repair marker is obvious. It's quick, inexpensive, and easy to keep in a drawer for the next furniture scrape or pet mark. That helps explain why the global wood floor scratch repair marker market was valued at $325 million in 2024 and is projected to reach $590 million by 2033, reflecting strong demand for cost-effective DIY fixes for minor surface damage over more expensive refinishing options, according to Research Intelo's wood floor scratch repair marker market report.
Start with the color, not the package
Most homeowners pick a marker by looking for “oak,” “walnut,” or “cherry” on the label. That's too broad. Real wood floors usually have more than one tone running through each board.
A better match comes from looking at two things:
- The base color of the board
- The darker grain lines that give the floor depth
That's why a single marker sometimes looks flat. Wood doesn't read as one solid color. It reads as light and dark working together.
Practical rule: If the scratch looks lighter than the surrounding floor, you need color correction. If it also has depth, color alone won't be enough.
Marker versus wax stick
A marker is best when the scratch is narrow and mostly visual. It adds color back where the finish got nicked.
A wax stick is better when there's a small depression that needs to be filled. It can bridge a shallow gouge in a way a marker can't. If you're weighing both, this guide on a scratch repair pen for wood helps sort out when a stain-style pen makes sense and when it doesn't.
Here's the simple comparison:
| Product | Best for | Main limitation |
|---|---|---|
| Repair marker | Light surface scratches and color loss | Doesn't fill missing material |
| Wax stick | Small indentations and shallow gouges | Can look smeared if overused |
Always test in a hidden spot
This is the step people skip, and it's the step that saves the repair.
Test the marker inside a closet, under a bed, or behind a sofa leg. Let it dry. Look at it in daylight and again with the room lights on. Floors in Richmond VA homes can read differently depending on whether they have older amber-toned finishes, cooler waterborne finishes, or a lot of natural light from large windows.
If the test spot disappears, you're ready. If it jumps out at you in any lighting, keep looking.
If you're unsure whether the scratch is even a marker problem, stop there. That pause is cheaper than trying to undo a bad touch-up.
The Professional's Guide to Applying Repair Markers
The biggest mistake I see is people trying to color a scratch the way they'd color with a felt-tip pen on paper. Wood doesn't work like that. A convincing repair has to mimic grain, shadow, and surrounding finish.
To see the flow at a glance, use this quick visual:
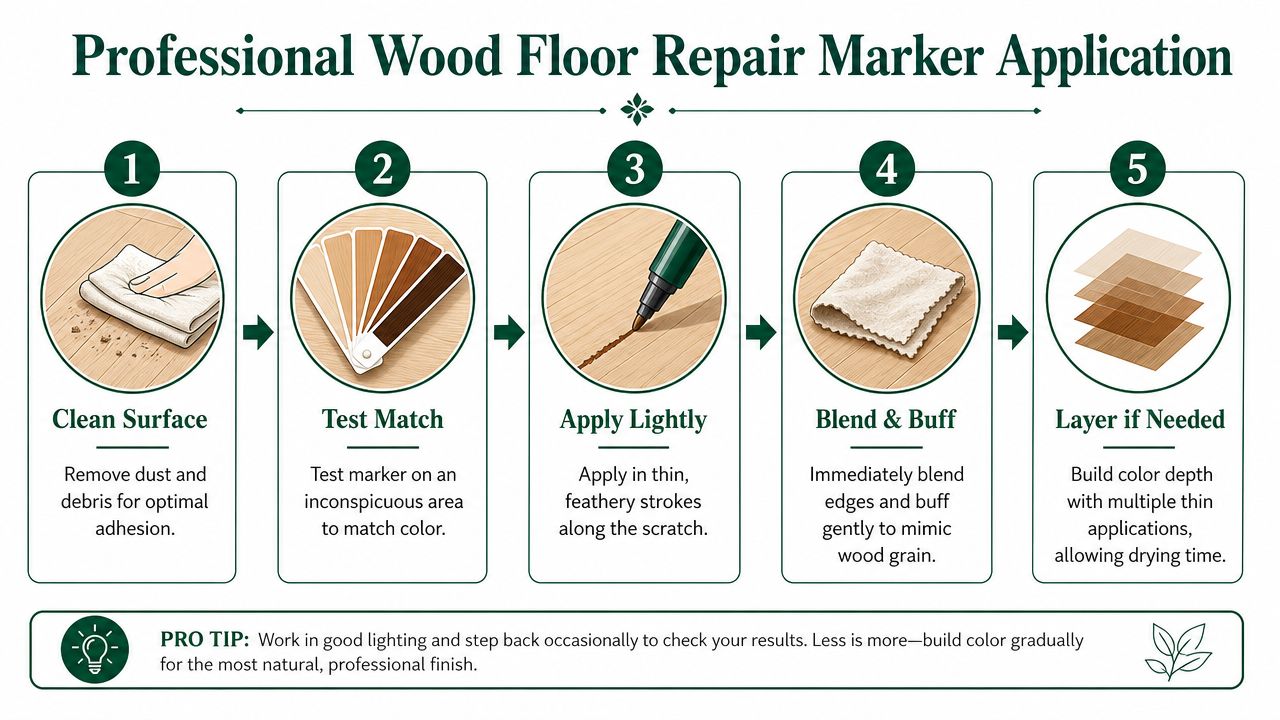
Clean the scratch first
Dust, grit, and furniture residue get in the way. Wipe the area with a soft cloth so you're not staining dirt and grinding debris into the finish.
Then do one more check. Run a fingernail across the mark. If your nail glides over it, a marker is still in play. If it catches hard, you may be crossing into filler territory.
Use the two-tone method
The repair method that works best is a two-tone application. The technique is straightforward, but timing matters. According to Polished Habitat's guide to repairing wood floor scratches, the expert approach is to first dab a darker marker only into the wood grain of the scratch to create natural-looking shadow, wipe the excess quickly, then apply a lighter marker over the full scratch to blend it with the surrounding floor. The marker dries in about five minutes, so excess stain needs to be wiped right away.
That sounds simple, but the sequence matters.
Dab the darker shade only in the deepest line
Don't color outside the scratch. You're simulating the shadow that real grain already has.Wipe immediately
Don't let extra pigment sit on the intact finish.Apply the lighter matching tone over the repair
This softens the contrast and ties the scratch back into the board.Buff gently with a clean cloth
Light pressure is enough. You're blending, not scrubbing.
A good marker repair doesn't erase every trace up close. It makes the scratch stop catching your eye at normal standing height.
Work in thin passes
Heavy application is what creates that dark, obvious patch homeowners hate. Thin passes give you room to build color slowly.
A few practical habits make a big difference:
- Follow the grain direction: Cross-grain strokes look fake fast.
- Keep a clean rag in your other hand: Wipe as you go.
- Layer lightly: It's easier to add than remove.
- Stop when it blends: More product doesn't mean a better repair.
There's also a useful walkthrough here if you want to watch the motion and pacing of the process:
What this method can and can't do
This approach works well on light-to-medium scratches where the damage is mostly visual. It doesn't rebuild finish thickness or replace missing wood fibers.
That matters in homes in Richmond VA where floors may already have years of wear near kitchens, entryways, and dining areas. If the floor has isolated surface scratches, this can be an excellent stopgap. If the finish is generally tired, you're no longer doing touch-up. You're masking a bigger condition problem.
If you're unsure whether your hardwood floors need refinishing, Buff & Coat can take a look and give you honest recommendations.
Common DIY Mistakes That Make Scratches Worse
A wood floor repair marker is helpful when it's used on the right damage. Used on the wrong spot, it can lock attention onto the repair instead of hiding it.
This is the pattern I see most often: the scratch was minor, the DIY fix was rushed, and now the floor has a darker, shinier, more obvious blemish than before.
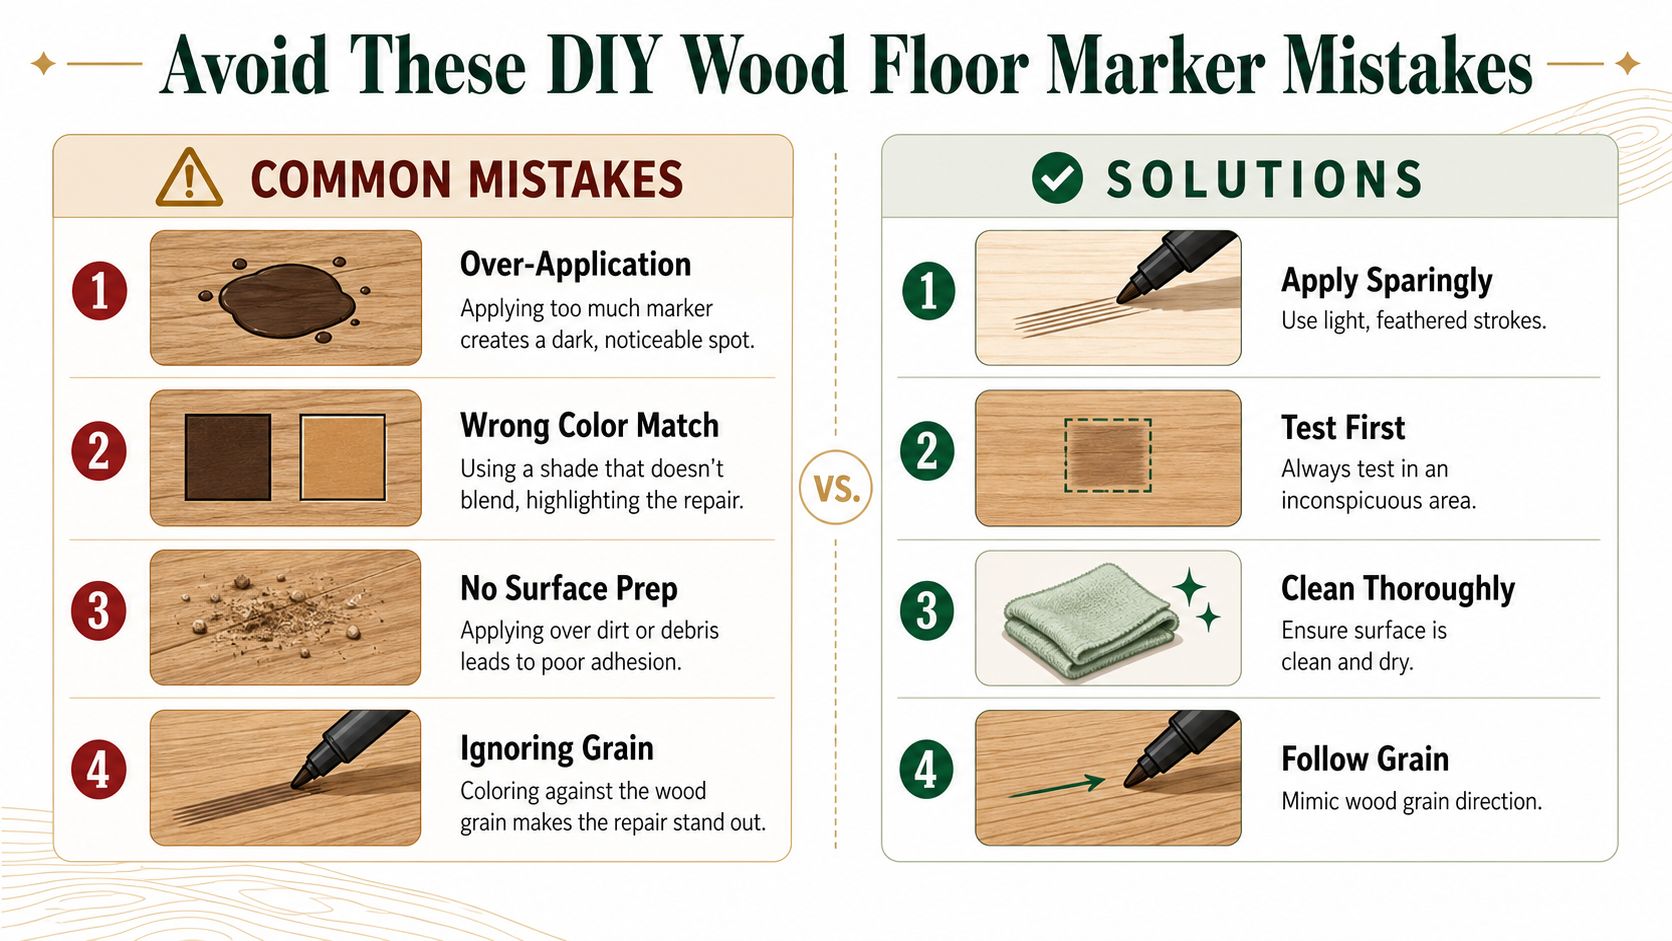
The repair is too dark
Over-application is common. A homeowner sees the scratch disappear while the stain is still wet, then comes back later and finds a hard-edged dark line.
Markers are pigments. If too much sits on top of the finish, it doesn't look like wood grain. It looks like ink.
The color match is close, but not close enough
“Close” often fails on a floor. Wood is one of those materials where a slightly wrong undertone shows up fast, especially in direct light.
The fix is simple but not glamorous. Test first. Then adjust. Sometimes that means blending two colors. Sometimes it means deciding the marker in your hand isn't the right product at all.
The finish is already gone
This is the biggest mistake, because it's not just cosmetic. Professionals point out that markers can't fix damage where the protective finish has been fully worn away. Graying or black spots mean water has reached raw wood fibers, and in that condition a marker won't solve the problem. Sanding or board replacement is usually needed, as explained in this discussion on markers and worn hardwood areas.
If you see gray, black, or a dry worn-through patch, stop. That area needs protection, not camouflage.
The marker adds color. It does not restore a missing clear coat.
The scratch keeps coming back
Sometimes the repair itself is fine, but the cause is still there. Dining chairs, sofa legs, planters, and bed frames do repeat damage in the same traffic paths.
For prevention, Guynn Furniture's floor protection tips are worth a look. Good pads and better furniture habits do more for floor life than most homeowners realize.
A few mistakes tend to travel together:
- Skipping surface prep leaves dust sealed into the repair.
- Ignoring grain direction makes the touch-up stand out.
- Using a marker on water damage hides the warning signs for a while, then fails.
- Trying to fix every scratch individually on a worn floor often leads to a patchwork look.
If the floor has isolated scratches, a marker is sensible. If the room has broad wear paths, repeated gouges, or moisture staining, the right answer usually shifts toward a professional buff and coat service or deeper repair.
Richmond homeowners: get a fast quote for refinishing or recoating.
Beyond Markers: Alternatives for Deeper Floor Damage
When your fingernail catches in the scratch, the repair has moved beyond a simple marker. At that point, you're choosing between products that color the damage and products that fill it.
A simple way to choose the right product
Think about the problem in layers.
If the damage is only visual, use a marker. If there's a shallow void, use wax. If there's a deeper gouge, look at filler. This guide on wood floor repair wax sticks is useful when you're in that middle zone where the scratch is too deep for a marker but not yet a whole-board issue.
Here's the practical comparison:
| Repair option | Best use | Watch out for |
|---|---|---|
| Marker | Surface scratches, light color loss | Won't level the surface |
| Wax stick | Small gouges, nail holes, shallow indentations | Can wear in busy areas |
| Wood filler | Wider or deeper damage | Needs careful color matching and finishing |
Wax sticks for small gouges
Wax sticks work well when there's a slight dip in the floor. You press material into the scratch, level it, and then blend the color. They're often a better choice than trying to flood a depression with stain.
They're especially useful for one-off furniture dings and isolated gouges on hardwood floor restoration jobs where the rest of the room still looks good.
Fillers for more serious defects
For deeper damage, filler is the more honest product. It acknowledges that wood is missing or compressed and needs rebuilding before color goes back on.
One issue homeowners often miss is whether the filler is stainable. If it isn't, the patch may stay flat-looking even after you color around it. That's part of why deeper repairs get tricky. Matching wood tone is one thing. Matching depth, grain, and sheen is another.
There's also a finish question. Some products sit differently under waterborne and solvent-based finishes, and that difference can show under light.
If you're standing there with both a marker and a filler in your hand, this is the rough rule: use the lightest effective repair. But don't force a marker to do a filler's job.
Knowing When to Call a Pro for Hardwood Floor Repair in Richmond
The smartest DIY homeowners aren't the ones who repair everything themselves. They're the ones who know when to stop before a simple scratch turns into a more expensive correction.
That's especially true with older hardwood in Richmond VA, engineered flooring with limited wear layer, and high-traffic family homes where wear isn't limited to one board.
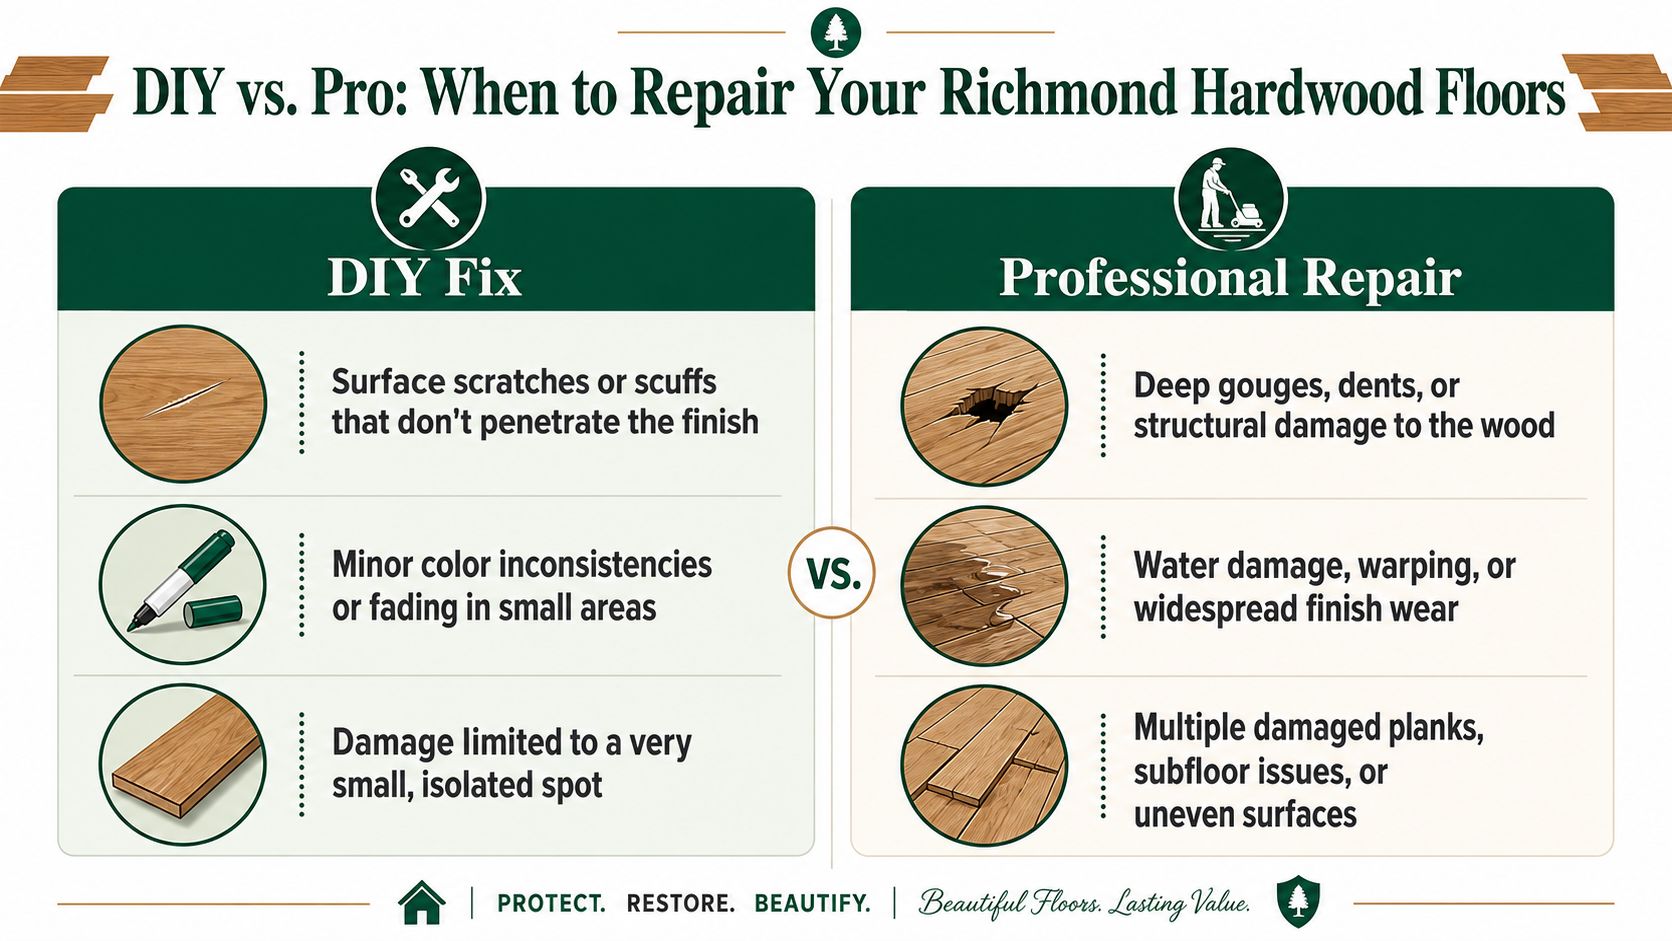
Clear signs the DIY fix should stop
There are a few conditions where I'd put the marker down right away.
Your fingernail catches hard in the damage
That usually means the defect has depth, not just color loss.The damage is spread across a whole traffic lane
Pet wear, chair scraping, and repetitive movement patterns usually need a room-level solution.You see black or gray boards
That points to moisture intrusion, not a simple scratch issue.Several planks are involved
Once multiple boards are damaged, spot touch-ups often start to look random.
Why cost matters, but not in the way people think
For small defects, a marker is still the right first step. In the DMV region, DIY scratch repair using markers and fillers costs $40 to $120, while professional spot repair for deep gouges runs $200 to $400, and localized professional repairs can range from $478 to $1,624. Full floor replacement can run $2,480 to $7,028 or more, according to Potomac Floors' hardwood floor scratch repair cost breakdown.
For homeowners comparing bigger options, full floor refinishing in Richmond VA typically costs $3 to $8 per square foot, according to Buff and Coat Virginia's refinishing cost guide.
Those numbers are why a marker is worth trying first on minor damage. They're also why it makes sense to stop guessing when the problem is bigger than a touch-up.
If one scratch is bothering you, use the least invasive fix. If the whole room is bothering you, stop treating it like one scratch.
When a buff and coat makes more sense
A buff and coat service is different from full sanding. It lightly abrades the existing finish and applies a fresh topcoat rather than removing the old finish entirely, as described on Buff & Coat Virginia's buff and coat service page.
That makes it a strong option when:
- The floor is dull and scratched across a broad area
- The finish is tired, but the wood itself is still in decent shape
- You want a cleaner, less invasive alternative to full sanding
- You're trying to improve appearance without jumping straight to replacement
If the damage is deeper, this guide to wood floor repair filler options can help you understand the next step before deciding on professional repair.
In Richmond VA, I see this decision a lot in older Fan homes, West End family rooms, and newer suburban houses with active kids and dogs. The mistake isn't trying DIY first. The mistake is staying with DIY after the floor has already told you it needs more.
Call 804-392-1114 or request a free estimate today.
Your Wood Floor Repair Questions Answered
Can I use a repair marker on engineered hardwood
Usually, yes, if the scratch is shallow and only affects the top surface. Use a light hand and test in a hidden area first. Engineered floors don't give you much room for aggressive correction, so overworking the spot can make it worse.
Why does the repair look shiny even when the color is right
That's often a sheen mismatch, and it's one of the most overlooked issues in DIY repair. Using the wrong marker type on the wrong finish can leave a visible difference in gloss that makes the repair stand out more than the scratch. This problem is discussed in this video on matching marker type to floor finish, especially for waterborne versus solvent-based finishes.
Can I use a permanent marker instead
No. It's the wrong product for the job. Permanent ink doesn't behave like a floor touch-up product, and if it bleeds into surrounding grain or finish, removing it can be harder than fixing the original scratch.
What if the floor is scratched all over, not just in one spot
That usually points away from a wood floor repair marker and toward wood floor recoating, a buff and coat, or full hardwood floor restoration. Spot repairs work best when damage is isolated. Once the whole room shows wear, uniform treatment usually looks better.
If you're trying to figure out whether you need floor refinishing in Richmond VA, a room-by-room inspection is the fastest way to get an honest answer.
Why Richmond Homeowners Trust Buff & Coat
For scratches that go beyond a quick touch-up, homeowners across Richmond VA want straight answers and solid workmanship. Buff & Coat Hardwood Floor Refinishing is a Richmond-based, owner-operated company with 15+ years of experience serving Richmond, Midlothian, Chesterfield, Henrico, Glen Allen, Short Pump, Mechanicsville, and occasional jobs in Charlottesville, Fredericksburg, and Virginia Beach.

Homeowners choose Buff & Coat because the company focuses on what counts:
- 15 years in business
- Dustless sanding systems
- Local, owner-operated
- High-quality finishes
- Clear pricing and honest advice
- 5-star customer service
The team handles dustless sanding, buffing and coating, hardwood floor installations, LVP/LVT installs, and repair work. If you're comparing hardwood floor refinishing, wood floor recoating, or full floor installation Richmond homeowners can feel comfortable with, practical guidance matters more than a sales pitch.
Ready to restore your hardwood floors? Buff & Coat Hardwood Floor Refinishing makes the process fast, clean, and stress-free. Call 804-392-1114 or request your free estimate at buffandcoatvirginia.com.


