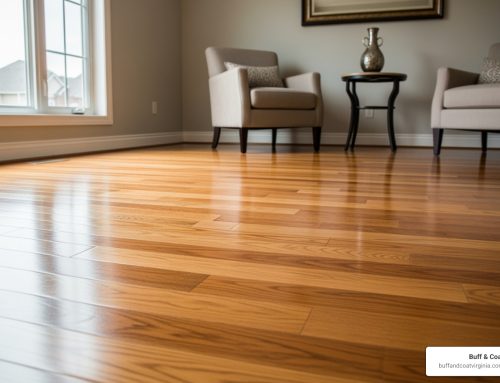
Can Engineered Wood Be Sanded? The Essential Facts
Engineered wood sanding is possible, but it requires careful consideration of your floor’s construction. Unlike solid hardwood, engineered floors have a thin hardwood veneer over a plywood core, which limits how many times they can be refinished. Many Richmond homeowners find that professional hardwood floor restoration can breathe new life into worn engineered floors, but the gentle approach required for these floors demands expertise and specialized equipment to avoid costly mistakes.
Quick Answer for Engineered Wood Sanding:
- Wear layer 2mm or thicker: Can be sanded 1-3 times
- Wear layer less than 2mm: Should not be sanded
- 6mm engineered flooring: Can be sanded up to 3 times
- 3mm engineered flooring: Can only be sanded once
- Always use gentle techniques: Orbital sanders, not drum sanders
The key to successful engineered wood restoration lies in understanding your floor’s wear layer thickness. As one flooring expert noted, “floors with a wear layer two millimeters or thicker respond well to sanding,” while thinner veneers risk irreparable damage.
I’m David Emmerling. With over 20 years of experience in hardwood floor restoration, I’ve helped countless homeowners steer the complexities of engineered wood sanding with our dustless refinishing processes. My hands-on approach ensures each project meets the exacting standards these delicate floors require.

Engineered wood sanding vocabulary:
- book dust-free floor sanding service
- cost of professional floor sanding services
- floor sanding contractors
Understanding Your Engineered Floor: The Key to a Successful Project
Before you dive into an engineered wood sanding project, you must understand your flooring’s construction. This knowledge is crucial and can save you from an expensive mistake.
Engineered wood flooring offers the best of both worlds: the gorgeous look of natural wood paired with rock-solid stability. The secret lies in its clever construction.
At the heart of your engineered floor sits a plywood core (sometimes high-density fiberboard). This isn’t just filler material – it’s the backbone that gives your floor its superpowers. This core provides superior moisture resistance and keeps your floors from expanding and contracting like solid hardwood often does.
The beautiful top layer you see every day is a thin hardwood veneer. This real wood layer gives your floors their authentic character – the grain patterns, rich colors, and natural beauty that drew you to hardwood in the first place.
What is the Wear Layer?
The wear layer is the top hardwood layer that takes daily punishment. Its thickness determines if your floors can handle sanding.
The veneer thickness varies dramatically between different engineered floors – some are paper-thin, others are surprisingly robust. On top of this precious hardwood layer sits a protective finish that acts like armor, shielding the wood from scratches and moisture.
This wear layer plays a crucial role in durability, but it’s also your limiting factor for refinishing. When considering engineered wood sanding, you’re essentially asking, “How much of this top layer can I safely remove?”
Measuring your wear layer isn’t rocket science, but it does require precision. You can often find this information in your flooring documentation, or a professional can measure it for you. This small measurement makes all the difference between a successful project and a flooring disaster.
How Many Times Can You Sand Engineered Wood?
Unlike solid hardwood that can be sanded multiple times, engineered wood has sanding limitations you cannot ignore.
The golden rule? Floors with wear layers under 2mm should never be sanded. The risk of damage is simply too high, and you’ll end up with expensive board replacements instead of beautiful restored floors.
If your wear layer measures 2-3mm thick, you’ve got one solid sanding in your future. Floors blessed with 4-6mm wear layers can typically handle 2-3 refinishing sessions over their lifetime.
| Wear Layer Thickness | Number of Times it can be Sanded |
|---|---|
| Less than 2mm | 0 (Not recommended) |
| 2-3mm | 1 |
| 3-4mm | 1-2 |
| 4-6mm | 2-3 |
| 6mm+ | 3+ |
These numbers aren’t set in stone. The condition of your existing finish, the depth of scratches, and the skill level of whoever’s doing the work all factor into the equation. For detailed guidance on restoring your specific floors, check out our comprehensive guide on Hardwood Floor Restoration Richmond VA.
The bottom line? Engineered wood sanding is absolutely possible, but it requires respect for your floor’s limitations and the right approach to get stunning results.
The Complete Guide to Engineered Wood Sanding and Refinishing
Restoring your worn, scratched engineered floors to their original beauty is achievable with the right approach. Engineered wood sanding demands a gentler touch than solid hardwood because you’re working with a thin veneer, leaving no room for aggressive techniques or mistakes.
Before you begin, proper preparation is everything. The room must be completely empty. Every piece of furniture, rug, and decoration needs to be moved elsewhere.
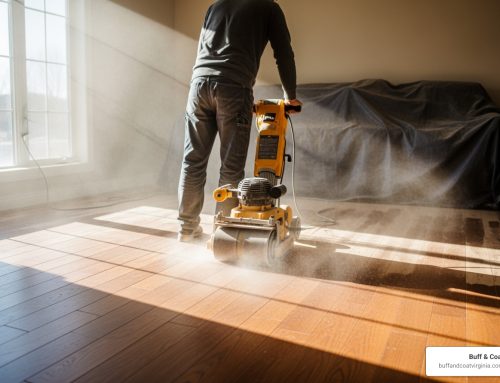
Safety should be your top priority. Engineered wood sanding creates fine dust particles that are hazardous to inhale. Professional contractors like those offering floor sanding services use specialized equipment to minimize these health risks, but if you’re going the DIY route, proper protective gear is non-negotiable.

Tools and Materials Needed
Getting the right equipment for engineered wood sanding is about protecting your investment. Using the wrong tools can turn your restoration project into an expensive disaster.
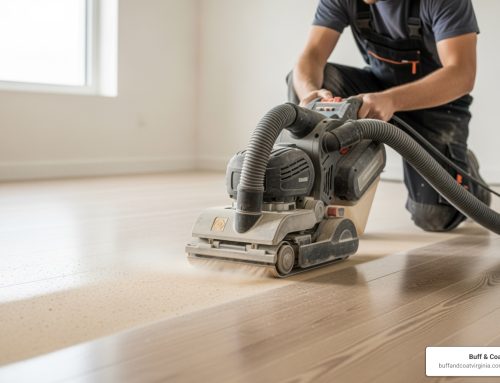
Your most important tool is an orbital sander. Unlike aggressive drum sanders used on solid hardwood, an orbital sander provides the gentle touch engineered floors need for delicate veneer work.
You’ll also need an edge sander for tricky areas along walls and corners. Sandpaper in various grits is essential – typically starting with 60 or 80 grit for removing old finish, progressing to 100 or 120 grit for smoothing, and finishing with 220 grit for that perfect pre-stain surface.
Don’t underestimate cleanup tools. A shop vacuum and tack cloths are critical for achieving a professional-looking finish. Even the tiniest dust particle can create imperfections in your final coat.
For the finishing phase, you’ll need wood stain (if changing colors), polyurethane finish, and proper applicators like lamb’s wool pads or synthetic brushes. Your safety gear should include safety glasses, a dust mask or respirator, and gloves.
If dust containment is a concern, consider exploring Dustless Sanding Wood Floors techniques that can keep your home cleaner.
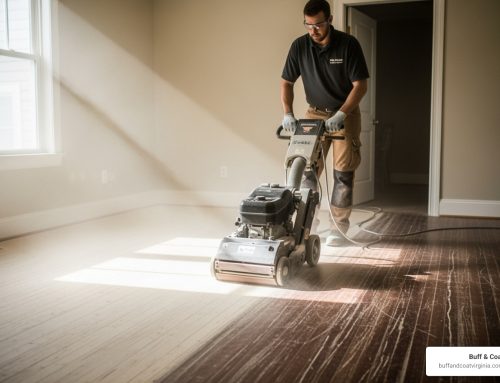
The Step-by-Step Engineered Wood Sanding Process
Patience is key when sanding your engineered floors. Rushing through engineered wood sanding is not advisable.
Start with thorough room preparation. Once cleared, walk the floor looking for protruding nails or staples. Hammer them below the surface to avoid tearing your sandpaper. Clean the floor with a vacuum or broom to remove loose debris.
Starting with coarse grit sandpaper (60 or 80 grit) on your orbital sander, your goal is to remove the old finish and minor surface imperfections, not wood. This is where the gentle approach really matters.
The sanding technique is crucial. Always sand with the grain of the wood. Keep your orbital sander moving constantly to avoid creating divots or uneven patches. Use smooth, overlapping passes with consistent, light pressure.
Progressing to finer grits is where your patience pays off. After the first pass, vacuum thoroughly. Switch to a finer grit (100 or 120 grit) and repeat the process. This step removes scratches from the coarser grit and creates a smoother surface.
Your final sanding pass with 220 grit creates the perfectly smooth surface needed for stain and finish adhesion. Your floor should feel silky smooth.
Don’t forget edge and corner sanding. Use an edge sander for the perimeter and hand sand tight corners with a sanding block, always with the grain.
Thorough dust cleanup cannot be overstated. Vacuum multiple times, then wipe every inch with tack cloths until the floor is spotless.

Applying Stain and Finish
This is where your engineered wood sanding project transforms into a gorgeous new floor.
If you’re staining, stain testing is essential. Engineered wood can absorb stain differently than solid wood. Test in an inconspicuous area and let it fully develop before committing.
Applying stain evenly requires working in manageable sections with the wood grain. Use a lamb’s wool applicator or brush, maintaining a wet edge to avoid lap marks. Wiping excess stain after the recommended time ensures even color.
Applying polyurethane coats requires patience. Thin coats are better than thick ones. Apply the first coat with a clean applicator, ensuring good ventilation.
Light sanding between coats with 220 or 320 grit sandpaper is essential for proper adhesion of subsequent coats.
Most floors benefit from multiple coats – typically two to three thin applications. Each coat builds durability and depth.
Curing time is critical. While floors might feel dry, they need time to fully harden. Avoid walking on them for at least 24-48 hours, and wait several days before moving furniture back. A few extra days of patience prevents months of regret.

For environmentally conscious homeowners, exploring Eco-Friendly Floor Refinishing options can provide beautiful results while keeping your indoor air quality healthy.
DIY vs. Hiring a Pro: Risks and Rewards
While the satisfaction of a DIY project is appealing, engineered wood sanding is a high-stakes task. The thin veneer layer offers virtually no margin for error, and mistakes can be financially devastating.
We’ve seen many DIY disasters. Sanding through the veneer is the most common, happening quickly with unfamiliar equipment. The exposed plywood core cannot be hidden by stain or finish.
Other common issues include uneven finishes, where subtle sanding inconsistencies become glaringly obvious after staining, and chatter marks—wavy lines from improper sander handling that are nearly impossible to remove.
If you’re dealing with significant damage, our comprehensive guide on Hardwood Floor Repair Richmond VA can help you understand your options. For those curious about the professional-grade equipment that makes all the difference, this detailed discussion on professional woodworking machinery offers fascinating insights.
When to Hire a Professional
Sometimes the smartest move is calling in the experts to avoid turning a manageable project into a floor replacement nightmare.
Deep scratches or gouges require a level of precision and experience that comes from years of professional work. Trying to remove deep damage yourself can create a much bigger problem.
Water damage also requires professional assessment. What looks like simple discoloration might indicate deeper structural issues that must be addressed before sanding.
If your wear layer is very thin (less than 2mm), professional equipment and expertise can mean the difference between a successful refinish and disaster. We have specialized tools and techniques for challenging situations.
Lack of experience or proper tools is another reason to hire a pro. The necessary equipment is expensive and requires skill to operate safely on delicate floors.
Many of our clients choose professional service for a dust-free process. Our advanced systems capture up to 99% of airborne dust, keeping your home clean and your family healthy, without the hassle of plastic sheeting and lingering dust.
We’ve built our reputation on understanding what each floor needs. Our article on The Importance of Hiring Professionals for Hardwood Floor Refinishing: Buff Coat’s Expertise explains our approach. For local homeowners, we provide Expert floor refinishing services in Richmond with a personal touch.
What are the Risks of Sanding Engineered Wood?
Understanding the risks of engineered wood sanding helps you make an informed decision.
Sanding through to the plywood core is the ultimate nightmare. Once the veneer is gone, that section is irreparably damaged.
The financial impact can be staggering. Costly board replacement becomes the only option, and finding matching planks for older flooring can be difficult and expensive.
Attempting DIY engineered wood sanding can also void your manufacturer warranty. Most manufacturers have specific guidelines for refinishing their products.
Uneven color absorption is another frustrating risk. A floor that looks perfectly sanded can absorb stain unevenly, resulting in a mottled, unprofessional appearance that screams “DIY gone wrong.”
These risks are meant to help you make the best decision for your floors, whether that means doing it yourself or trusting experts to protect your investment.
Frequently Asked Questions about Sanding Engineered Wood
Homeowners have many questions about engineered wood sanding. With over twenty years in the business, I’ve heard them all. Here are straight answers to the most common concerns to help you make the right decision.
Can all engineered wood floors be sanded?
No, not all engineered wood floors can be sanded. It all comes down to the wear layer. If your wear layer is thinner than 2mm, attempting to sand it is extremely risky. One wrong move and you’ll sand right through to the plywood core underneath, which means expensive plank replacements.
Before you consider engineered wood sanding, get the wear layer measured. A flooring professional can help, or you can sometimes check your manufacturer’s specs.
What’s the difference between sanding and a “buff and coat”?
Understanding this difference could save you money and preserve your floors.
Sanding is the heavy-duty option. It removes the existing finish plus a thin layer of wood, making it ideal for deep scratches, major wear, or changing the color. However, each sanding uses up some of the precious wear layer.
A buff and coat, on the other hand, is a gentler process. We lightly scuff the existing finish so a fresh topcoat can adhere. No wood is removed; the finish is simply refreshed. It’s perfect for floors that have lost their shine but don’t have deep damage.
A buff and coat can extend your floor’s life significantly without touching the valuable wear layer. Many of our Richmond clients are amazed at how this gentler approach makes their floors look new again.
How do I maintain my floors after refinishing?
Protecting your investment in refinished engineered floors is simple with consistent maintenance.
Daily care makes the biggest difference. A quick sweep or vacuum with a soft brush attachment removes the grit and dirt that acts like sandpaper on your finish.
Weekly cleaning with pH-neutral cleaners is best. Use a damp mop (not soaking wet!) with products made specifically for hardwood.
Furniture protection is crucial. Felt pads under furniture legs prevent countless scratches. Replace them regularly as they wear out.
Area rugs in high-traffic zones like entryways and hallways are your floors’ best friends. They catch dirt and provide a buffer against daily wear.
Finally, clean up spills immediately. Water and wood finishes don’t mix well, so act fast when accidents happen.
For more detailed guidance, check out The Impact of Proper Hardwood Floor Maintenance with Buff Coat Virginia. A little care goes a long way.
Restore Your Floors with Confidence
Engineered wood sanding can breathe new life into your floors, but success hinges on understanding their construction. The wear layer’s thickness is the difference between a stunning result and a costly mistake.
The gentle approach we’ve discussed—using orbital sanders, progressing through grits methodically, and maintaining a light touch—isn’t just recommended; it’s essential. The stakes are real. Sanding through to the plywood core or creating uneven finishes and chatter marks are common outcomes when the delicate nature of engineered wood isn’t respected.

This is where professional expertise becomes invaluable. At Buff & Coat, we’ve seen every scenario, from successful DIY projects to floors needing board replacement after well-intentioned attempts went wrong. Our dust-free techniques and specialized equipment are about protecting your investment and ensuring lasting results.
Sometimes, the best approach isn’t sanding at all. Our signature buff and coat process can work miracles on floors that have lost their luster but are otherwise in good condition.
Professional results come from understanding the how, when, and why. We assess each floor individually, measuring wear layers and evaluating damage to recommend the best approach for your situation and budget.
While engineered wood sanding is achievable with the right knowledge, there’s no substitute for experience. We provide free estimates for every project. Ready to explore your options? Contact us today to schedule a free inspection and receive an honest assessment of what your floors really need.