Why Installing Wood Flooring on Concrete is Totally Doable (And Worth It!)
Install wood flooring on concrete – yes, it’s absolutely possible. Homeowners do it every day to transform cold spaces into warm, beautiful rooms. The key is proper preparation, which turns concrete into a strong, durable subfloor.
Quick Answer for Installing Wood Flooring on Concrete:
- Test concrete moisture – Use moisture meters or plastic sheet tests.
- Prepare the surface – Clean, level, and install a vapor barrier.
- Choose your method – Glue-down, floating floor, or plywood subfloor.
- Acclimate wood – Allow 7-10 days for moisture equilibrium.
- Install carefully – Follow manufacturer guidelines and leave expansion gaps.
The shift from cold concrete to the timeless appeal of hardwood floors completely changes a room’s feel. However, moisture is your biggest enemy. Industry research shows moisture causes over 90% of hardwood flooring failures on concrete.
Engineered hardwood is often the best choice for concrete, as it’s more stable and handles humidity changes better than solid wood. Still, with the right prep, both can work beautifully.
The concrete slab’s grade level also matters. Above-grade and on-grade slabs are easier, while below-grade installations (like basements) need extra moisture precautions.
I’m David Emmerling, and with over 20 years in hardwood floor restoration, I’ve seen countless successful projects. Homeowners can install wood flooring on concrete with the right preparation. The key is not rushing moisture testing and preparation—these phases make or break the project.

Important install wood flooring on concrete terms:
Pre-Installation Essentials: Choosing Your Materials and Understanding Your Slab
Before you install wood flooring on concrete, you must understand your foundation. Just like building a house, understanding your concrete slab and choosing the right materials is the difference between a floor that lasts decades and one that causes headaches.

Choosing the Right Wood: Engineered vs. Solid
When you install wood flooring on concrete, you have two main options: engineered and solid hardwood.
Engineered hardwood is like a reliable friend who adapts well. It’s built with multiple layers, giving it a stable core. This construction makes it incredibly stable against moisture, so you can install it at any grade level, even in basements.
Solid hardwood, on the other hand, is a traditional beauty but needs more care. As a single piece of wood, it’s more sensitive to humidity changes. While gorgeous, solid wood works best on on-grade or above-grade concrete slabs. We avoid installing solid wood in basements.
The winner for most concrete installations? Engineered wood takes the crown for its stability and moisture resistance.
Understanding Concrete Grade Levels
Your concrete slab’s location dictates moisture risk, a crucial factor when you install wood flooring on concrete.
Below-grade slabs are in basements, surrounded by moist soil. These spaces have higher humidity, and moisture can seep through the concrete. For a basement slab, engineered hardwood is your safest bet, and you’ll need extra moisture control.
On-grade slabs sit at ground level, like in ranch homes. They face moderate moisture challenges from seasonal changes and still require proper moisture testing and vapor barriers.
Above-grade slabs are on upper floors and are the easiest to work with since they’re away from ground moisture. However, indoor humidity and potential plumbing leaks can still cause problems.
The Critical Step of Acclimation
Proper acclimation separates pros from amateurs. It lets your wood flooring adjust to its new home before installation.
Your hardwood needs 7-10 days to adjust to the room’s temperature and humidity. Unbox the planks and stack them with spacers in the installation room. Keep the room’s relative humidity around 45 percent—the sweet spot for most hardwood.
Wood is hygroscopic; it absorbs and releases moisture. Skipping acclimation can lead to gapping in winter or buckling in summer. A moisture meter helps confirm when your wood has reached equilibrium.
What About Radiant Heat?
Radiant heating in concrete is popular, and you can still have hardwood floors. The key is using the right materials and procedures.
Engineered wood handles radiant heat better than solid wood due to its layered construction. If you want solid wood over radiant heat, consider a floating plywood subfloor to buffer the heat.
With radiant systems, turn off the heat 24 hours before installation and keep it off throughout. Afterward, raise the temperature gradually over several days. Sudden temperature changes are the enemy.
For complete technical guidelines, check out The official NWFA guidelines for installing over concrete. These industry standards ensure your project meets professional requirements.
The Foundation of Success: Concrete Subfloor Preparation
Preparing your concrete subfloor is like laying a house’s foundation—if you rush it, the entire project will suffer. When you install wood flooring on concrete, this phase makes or breaks your project. I’ve seen many floors ruined by skipped prep work. Proper preparation saves you from expensive repairs later.

The three pillars of preparation are moisture testing, surface preparation, and vapor barrier installation. Get these right for a floor that lasts for decades.
Testing for Moisture: The Most Important Step
Moisture is the number one enemy of hardwood over concrete. More floors fail from moisture than any other cause.
Concrete may look dry, but it holds moisture like a sponge. This moisture can cause buckling, cupping, gaps, and mold in your hardwood. Ensure your concrete is at least 30-60 days old before testing, as new concrete is full of moisture from curing.
You have several reliable testing methods. Moisture meters offer quick surface readings but don’t measure deep moisture.
The calcium chloride test places a dish of calcium chloride under a sealed dome for 60-72 hours. The weight gain reveals the moisture vapor emission rate.
Relative humidity testing is the gold standard. Probes are inserted into small holes in the slab to measure internal humidity, giving the most accurate picture. Here’s a helpful guide on how to test the relative humidity of a concrete slab.
For a quick DIY check, use the plastic sheet test. Tape a 15-inch square of clear plastic to the slab for 24-48 hours. Condensation or darker concrete indicates moisture.
Different flooring has different tolerances. Solid hardwood typically requires moisture below 4%, while engineered can handle up to 12%. Always check your manufacturer’s recommendations.
Achieving a Flat and Clean Surface
An uneven subfloor is a major problem. The National Wood Flooring Association requires concrete to be flat within 1/8 inch over a 6-foot span.
Check for flatness with a long straight edge. Mark high spots for grinding and low spots for filling.
High spots are ground down with a concrete grinder. Low spots deeper than 1/4 inch are filled with self-leveling compound.
Your concrete must be perfectly clean. Remove all sealers, waxes, oils, paint, and debris, as these contaminants prevent proper adhesion.
Crack repair is non-negotiable. Patch small cracks, but have large structural cracks professionally evaluated.
For more detailed guidance, check out our guide on preparing concrete for residential flooring.
Installing a Moisture Barrier
Even with good moisture tests, always install a vapor barrier. It’s insurance for your investment, protecting against residual moisture.
Six-mil polyethylene sheeting is the standard. Lay the film over the concrete, overlapping edges by 4-6 inches and sealing them with moisture-resistant tape. Use construction-grade film with a perm rating of 0.13 or less.
All-in-one adhesives are a modern option for glue-down installations. These urethane adhesives provide both adhesion and moisture protection, simplifying the process.
The goal is to prevent moisture from migrating from the concrete to the wood. A proper barrier ensures even small moisture fluctuations won’t affect your hardwood.
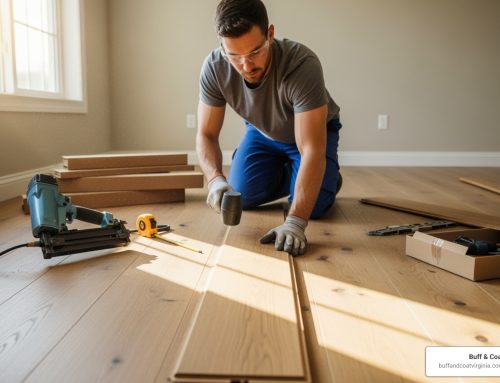
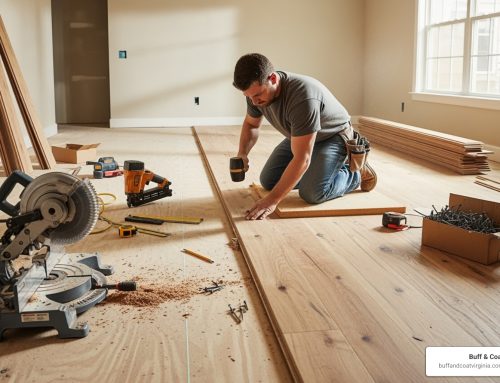
Step-by-Step Guide: How to Install Wood Flooring on Concrete
With your subfloor prepped, it’s time to install wood flooring on concrete. There are three proven methods, and the right choice depends on your wood type, situation, and preference.

Method 1: The Glue-Down Installation
The glue-down method creates a stable, solid, and quiet floor. It works best with engineered hardwood, which handles direct contact with concrete well. The key is a specialized urethane adhesive designed for wood-to-concrete jobs. Many modern adhesives also act as a moisture barrier.
Using a notched trowel (check manufacturer specs for size), spread adhesive over small, manageable sections of concrete so it doesn’t dry before you lay the planks. Lay each plank into the wet adhesive. Walk on the new sections and use a 100-pound roller to ensure a strong, permanent bond.
Allow the floor to cure for at least 24 hours before foot traffic and 48 hours before placing heavy furniture. For more on this method, see our guide on glueing hardwood to concrete.
Method 2: The Floating Floor Installation
A floating floor isn’t attached to the concrete, making it a great DIY option. It works best with engineered wood featuring click-lock or tongue-and-groove systems.
The process starts with a quality underlayment pad over your moisture barrier. This foam or cork layer cushions the floor, absorbs sound, and adds moisture protection.
The click-lock system allows planks to snap together easily, creating a unified floor that floats over the subfloor without messy adhesive.
A critical step is leaving expansion gaps (1/4 to 1/2 inch) around the perimeter and any obstacles. This allows the floor to expand and contract with humidity changes, preventing buckling. Baseboards will hide the gaps. This method is ideal for slightly uneven concrete or if you want a floor that can be removed later.
Method 3: Installing a Plywood Subfloor
Creating a wood subfloor over the concrete opens up all installation options, including nailing down solid hardwood.
The trade-off is added floor height (about 1½ inches). Check door clearances and plan transitions before choosing this method.
First, lay a moisture barrier (6-mil polyethylene sheeting). Then, fasten the plywood to the concrete using power-actuated fasteners or construction adhesive. Leave expansion gaps of ¾ inch at walls and ¼ to ½ inch between plywood panels to allow for movement.
Once the plywood subfloor is secure, you can nail down solid wood just like a traditional installation, achieving that classic hardwood feel.
Here’s a quick comparison to help you decide:
| Installation Method | Best Wood Type | Skill Level | Floor Height Change | Best Situations |
|---|---|---|---|---|
| Glue-Down | Engineered hardwood | Moderate to high | Minimal | Stable, quiet floors; most concrete situations |
| Floating Floor | Engineered hardwood | Low to moderate | Minimal plus underlayment | DIY projects; slightly uneven concrete |
| Plywood Subfloor | Solid or engineered | Moderate to high | Significant (1-1.5″) | Traditional nail-down; very uneven slabs |
Each method can create a stunning floor when done correctly. Match the technique to your concrete, skill level, and goals.
Tools, Materials, and Avoiding Common Mistakes
Having the right tools and materials is essential to install wood flooring on concrete. Proper equipment prevents a frustrating project that needs redoing.
Essential Tools and Materials for the Job

A moisture meter is a non-negotiable investment. You’ll need one for both concrete and wood to monitor conditions and prevent disasters.
For glue-down jobs, a notched trowel is key; follow the adhesive manufacturer’s size recommendation. Use a 100-pound roller to ensure proper adhesive transfer. Skipping the roller can lead to hollow spots and adhesive failure.
Layout tools like a chalk line and tape measure ensure straight lines. Sharp, accurate cutting tools like a miter saw, circular saw, or jigsaw are necessary for clean cuts. For installation, you’ll need a tapping block, pull bar, and rubber mallet. Use knee pads, safety glasses, and gloves for protection.
For subfloor prep, you may need a concrete grinder and leveling compound. Every job needs a 6-mil polyethylene vapor barrier unless your adhesive includes one. Floating floors require foam or cork underlayment, while a plywood subfloor needs exterior-grade plywood and power-actuated fasteners.
Pro tip: Order 10% extra flooring to account for cuts, mistakes, and defective boards.
Potential Problems When You Install Wood Flooring on Concrete Incorrectly
Shortcuts and poor prep can ruin a floor. Moisture is the number one enemy, but other problems can arise.
- Buckling is when the floor lifts, usually from excess moisture or inadequate expansion gaps.
- Cupping is when plank edges curl up, a sign of moisture getting to the bottom of the boards.
- Gapping between planks is often caused by improper acclimation or low humidity.
- Warping and twisting happen when boards absorb moisture unevenly and require replacement.
- Mold and mildew growth can occur underneath the floor from persistent moisture.
- Adhesive failure results in loose or squeaky planks, often due to a contaminated surface or wrong adhesive.
Knowing When to Call a Professional
The smartest move is knowing when a project is beyond your skill level.
- Complex moisture issues are best left to pros who have specialized equipment.
- Severely uneven concrete slabs require industrial grinders and experience to flatten efficiently.
- Time constraints may make a professional a better choice, as they can finish in days what might take you weeks.
- Warranty compliance for many flooring products requires professional installation.
- Radiant heating systems add complexity and require specific installation techniques.
Hiring a pro provides peace of mind. They are insured, guarantee their work, and can prevent and troubleshoot problems you might not recognize. For more on costs, see our guide on understanding flooring installation costs. The goal isn’t just to install wood flooring on concrete—it’s to create a durable floor that lasts for decades.
Conclusion: Enjoying Your New Hardwood Floors
Now that you understand the key steps—from testing your slab to choosing the right wood and installation method—you can successfully install wood flooring on concrete. The journey from cold concrete to warm hardwood is achievable with proper prep and moisture management.
The change is remarkable. A cold concrete surface becomes a warm, welcoming space, adding long-term value to your home. Durable hardwood is a worthwhile investment that lasts for decades when installed correctly.
Success depends on not rushing preparation. Moisture is your biggest enemy, so thorough testing and a vapor barrier are non-negotiable. The glue-down, floating, or plywood subfloor methods can all yield beautiful results if done correctly. Proper prep is the foundation of your project. Taking time to acclimate the wood, flatten the slab, and ensure it’s clean and dry will prevent costly problems like buckling or cupping.
For homeowners in the Richmond, VA area, a perfect installation is key to protecting your investment. If the process seems daunting, our expert team at Buff & Coat specializes in professional floor installation and guarantees a beautiful, long-lasting result. We have the experience to handle the unique challenges of concrete subfloors, including moisture issues and uneven slabs.
Don’t let a concrete slab stop you from having the hardwood floors of your dreams. The warmth and value they add are worth the effort, whether you DIY or hire a pro.
Ready to transform your space? Schedule your free, no-obligation estimate and inspection by contacting us today. We’re here to help you make your flooring vision a reality.