Why Scratched Wood Floors Don’t Have to Stay That Way
You can Fix Scratched Wood Floors quickly with the right approach and restore your hardwood floors in less than an hour. Whether you’re dealing with minor surface scratches or deeper gouges, there are proven methods to address the damage without breaking the bank.
Quick Fix Methods for Scratched Wood Floors:
- Surface scratches: Walnut meat rubbing or wood markers
- Minor scratches: Wood filler sticks or blending pencils
- Deep scratches: Wood putty and stain matching
- Multiple scratches: Polish and restorers for widespread areas
- Prevention: Furniture pads, rugs, and regular maintenance
Scratched hardwood floors are a common complaint, but many can be fixed with simple DIY methods. The key is understanding the type of scratch you’re dealing with. Surface scratches respond well to quick fixes, while deeper gouges that penetrate the wood may need more involved solutions.
As David Emmerling, President of Buff & Coat Hardwood Floor Refinishing with over 20 years of experience, I’ve helped thousands of Richmond-area homeowners Fix Scratched Wood Floors through DIY guidance and professional services. My hands-on approach ensures every repair meets the highest standards, from simple touch-ups to complete refinishing projects.

Simple Fix Scratched Wood Floors glossary:
First, Assess the Damage: Is It a Scratch or a Gouge?
Before you can Fix Scratched Wood Floors, you need to figure out what you’re dealing with. Not all damage is equal, and the wrong repair method can make the problem more noticeable. What looks like major damage might be a simple surface scuff, while a minor mark could be deeper than you think.

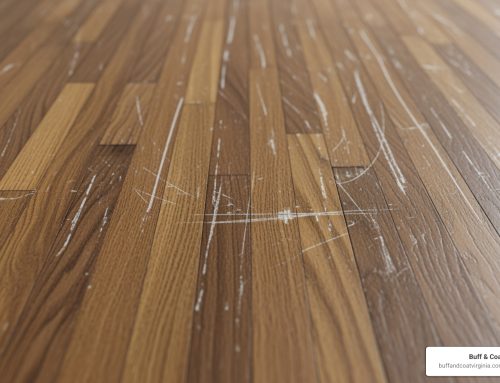
Understanding Scratch Types
Your hardwood floor has a protective top finish over the wood. The depth of the damage determines the repair method.
Surface scratches only affect the top finish layer, often appearing as white marks. If your fingernail glides over it without catching, it’s a surface scratch. These are cosmetic and don’t compromise the floor’s protection.
Minor scratches go through the finish and lightly touch the wood. Your fingernail will catch slightly. You might see the lighter raw wood, which requires color matching to blend in.
Deep scratches and gouges cut through the finish and into the wood. Your fingernail will catch noticeably. The exposed wood is vulnerable and needs proper filling and refinishing. Severe cases might require hardwood floor damage repair or board replacement.
The fingernail test is your best friend here. No catch means surface level, a slight catch means minor, and a deep catch means you have more work to do.
Common Culprits Behind Floor Scratches
Understanding the cause helps you Fix Scratched Wood Floors and prevent future damage.
Furniture movement is the biggest troublemaker. Dragging a heavy table or even repeatedly pulling out a chair without protection can cause deep gouges and scratches.
Pet activity, especially from dogs, can leave a trail of claw marks if nails aren’t trimmed regularly.
High heels and hard-soled shoes concentrate weight into tiny points, which can dent even the hardest woods. A person in stilettos can exert over 1,000 pounds of pressure per square inch.
Dropped objects like kitchen knives, tools, or heavy toys can chip or gouge your floor in an instant.
The sneakiest culprit is dirt and grit. Tiny particles act like sandpaper underfoot, grinding into the finish and creating widespread surface scratches that dull your floors. Regular cleaning is essential for protection.
Once you know the scratch type and its cause, you can choose the right repair method.
Quick DIY Methods to Fix Scratched Wood Floors
The good news is that most annoying scratches on your hardwood floors can be fixed with simple, affordable DIY methods. You don’t need to be a master craftsman or buy expensive tools to restore your floors. Professional refinishing can cost thousands, making these DIY solutions appealing. The key is using the right method for your specific scratch.
These DIY solutions to Fix Scratched Wood Floors are attractive because they use common household or hardware store products. We’ve guided many Richmond homeowners through these techniques with surprising results. Customer reviews often highlight how effective these products are, with furniture repair kits being particularly popular for tackling multiple issues at once.
The Walnut Trick: A Natural Fix for Minor Scratches
This might sound like an old wives’ tale, but the walnut trick works. It’s a surprisingly effective natural remedy.

The natural oils in walnut meat camouflage minor surface scratches by darkening the lighter scratch to blend with the surrounding wood.
Start with a fresh, shelled walnut. Gently rub the walnut directly over the scratch, moving along the wood grain. You’ll see the oils working as the scratch begins to blend.
Let the oils penetrate for about five minutes, then use a soft, clean cloth to buff the area and remove any excess residue. This creates a smooth, blended finish.
This method is great for light surface scratches and scuffs. While temporary, it’s amazing how well it fades scratches on many wood types. Plus, it’s natural and safe for family and pets.
Using Wood Markers and Filler Sticks to Fix Scratched Wood Floors
For more noticeable scratches, wood markers and wax filler sticks are excellent. They come in many shades to match most wood floors.
Wood markers are like stain-filled pens, perfect for coloring in minor scratches where the finish is gone. Wax filler sticks go a step further by filling small indentations while adding color.
The key is choosing the right shade. Always test your color in an inconspicuous area first; it’s easier to go lighter and build up color than to correct a dark repair.
Start by cleaning and drying the scratched area. For markers, draw along the wood grain. For filler sticks, rub the wax firmly into the scratch to fill it completely.
Immediately wipe away any excess product from the surrounding wood with a soft cloth. This is crucial for a seamless blend. For extra protection, you can apply a thin layer of clear topcoat once dry.
These methods excel at camouflaging minor defects. For deeper scratches, check out our Hardwood Floor Scratch Filler: Ultimate Guide.
Restoring Shine with Polish and Restorers
Sometimes, the issue isn’t distinct scratches but widespread dullness from fine abrasions that make the floor look tired. Wood polishes and restorers can bring back the luster and blend away these minor imperfections.
These products contain conditioning oils and light protective coatings that fill microscopic scratches, creating a smoother, more reflective surface. The result is renewed shine and camouflaged light scratches.
The process requires thorough preparation. Sweep or vacuum, then clean with a pH-neutral hardwood floor cleaner and let it dry completely.
Most restorers have an easy mop-on application. Work in small sections, spreading the product evenly with a clean, damp mop or microfiber pad, following the manufacturer’s instructions.
Allow complete drying time before walking on the floor, which can take 30 minutes to a few hours. Some polishes benefit from light buffing once dry for extra shine.
These products also create a protective layer against future light scratches. They’re great for floors with general dullness. Learn more in our guide to Restoring Shine: Hardwood Floor Buff and Coat for Dull Floors.
Preventing Future Scratches on Your Hardwood Floors
Knowing how to fix scratched wood floors is satisfying, but preventing them is even better. After 20 years of restoring floors in Richmond, I’ve seen that the best floors belong to homeowners who master prevention, not those with the most expensive finishes. Every scratch you prevent is a repair you don’t have to make.

Furniture pads are your floor’s best friend. Attach these felt circles to the bottom of all furniture legs. Check them regularly, as worn-out pads can become abrasive. I suggest making it part of your seasonal cleaning routine.
Area rugs act as armor for high-traffic spots like entryways and hallways. A well-placed rug absorbs wear that would otherwise dull your hardwood. Always use a quality rug pad underneath to prevent slipping and friction damage. This Old House offers excellent preventive care tips that we recommend.
Regular cleaning isn’t just about appearance – it’s about protection. Tiny particles of sand and grit act like sandpaper under every footstep. A quick daily sweep or vacuum with a soft brush attachment makes an enormous difference. For our comprehensive approach, see our guide on high traffic floor protection.
Pet owners, keep those claws trimmed. We love our pets, but their nails can leave a trail of scratches. Regular nail trimming is essential for your floors.
The no-shoes policy helps tremendously. High heels are particularly brutal on hardwood. Asking guests to remove outdoor shoes also cuts down on tracked-in debris.
Many people don’t realize that maintaining indoor humidity between 35% and 55% is crucial. It keeps wood stable, preventing shrinkage from dry air or expansion and buckling from excess moisture.
Once these habits become part of your routine, protecting your floors feels effortless. And when you do need to fix scratched wood floors, you’ll be dealing with isolated incidents rather than widespread wear.
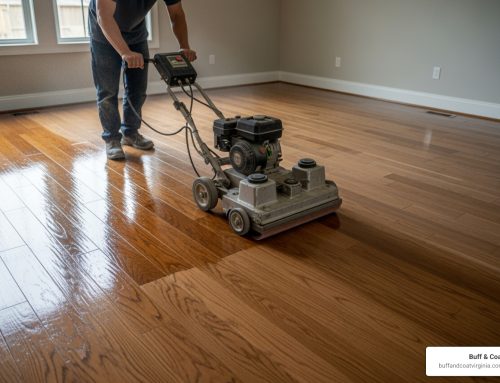
When DIY Isn’t Enough: Signs You Need a Professional
While DIY is satisfying, when it comes to Fix Scratched Wood Floors, good intentions can sometimes lead to bigger headaches. After two decades of restoring floors in Richmond, I’ve seen many DIY attempts that needed professional rescue. Some damage simply requires the expertise and tools that only a professional can provide.
Deep gouges and extensive damage are clear red flags. If you feel a significant indentation or scratches cross multiple boards, DIY fillers won’t suffice. This deep damage requires professional sanding, filling, color matching, and finishing to look seamless.
Widespread scratches across entire rooms are also tough to tackle alone. When the whole floor is dull from countless abrasions, you need a comprehensive approach like professional floor sanding. A restorer offers a temporary fix, but it can’t replicate the like-new appearance of a proper refinishing.
Water damage, warped boards, or discoloration signal deeper problems that require specialized knowledge. Trying to sand out water stains or flatten warped boards without the right equipment can make things much worse.
Previous DIY attempts that didn’t go as planned also require professional intervention to correct properly. Whether the stain didn’t match or the filler left a bump, we can fix it.
Engineered hardwood floors have a thinner top layer than solid hardwood, meaning fewer chances to sand and refinish. If you have deep scratches on engineered floors, get a professional assessment before attempting repairs.
The average cost of professional hardwood floor refinishing ranges from $1,000 to $3,000. While DIY is appealing for minor issues, this investment protects your home’s value when facing extensive damage.
At Buff & Coat, we offer comprehensive hardwood floor repair solutions in Richmond, VA, and nearby areas like Chesterfield and Midlothian. Our signature buff and coat process can often restore floors without full sanding, providing a less invasive, affordable professional option for many types of damage.
Frequently Asked Questions about How to Fix Scratched Wood Floors
When trying to fix scratched wood floors, homeowners often have similar questions due to confusing information and terminology. Let’s clear up the most common ones.
What’s the difference between a scratch concealer and a scratch remover?
This question is common, as marketing terms are often used interchangeably. For example, a product like Trade Secret Scratch Concealer might be labeled a “remover,” but understanding its function is what’s key.
Scratch concealers are like makeup for floors. They add color or a reflective coating to make the scratch blend in, like a wood marker. The physical scratch remains, but it becomes invisible to the eye.
Scratch removers act on the scratch itself. Fillers like wax sticks or putty fill the indentation. Abrasive removers level the surrounding area, but we rarely recommend them for hardwood as they can damage the finish.
The key difference? Concealers camouflage while removers either fill or level. For most DIY repairs, you’ll use concealers for surface marks and fillers for deeper ones.
How do I choose the right scratch repair product?
Choosing a product at the hardware store can be overwhelming. Consider these factors:
Scratch depth is your starting point. Surface scratches need polish, the walnut trick, or a wood marker. If your fingernail catches slightly, use markers or wax filler sticks. Deep gouges require wood putty, stain, and a topcoat.
Color matching is critical. Many kits come with multiple shades. When in doubt, start lighter and build up the color. Always test in an inconspicuous spot first.
Product reviews and ratings are valuable. Look for products with high ratings and many reviews. Pay attention to feedback from users with similar wood types or scratch issues.
The best product matches your specific situation and skill level.
Can deep scratches be completely removed with DIY methods?
This is our most-asked question. The honest answer: rarely, and almost never perfectly. DIY methods can make deep scratches much less noticeable, but a “like it never happened” result usually requires professional help.
The reality of DIY limitations is that filling a deep gouge is like patching a hole. Getting a perfect blend with the wood grain and finish is very challenging. The patch may look different in certain light or wear differently. The goal of DIY is to make the scratch less bothersome, not invisible.
True removal involves sanding down the floor until the scratch disappears, then applying fresh stain and finish. This requires professional-grade equipment and experience to avoid creating uneven spots.
That’s where professional help is invaluable. For severe damage, we might even recommend hardwood floor board replacement. We have the tools and experience to either refinish the area properly or perform a seamless board replacement.
Conclusion: Keep Your Floors Looking Flawless
Your hardwood floors are a significant investment that adds warmth and value to your home. The good news is that most scratches don’t have to be a disaster.
We’ve explored practical ways to fix scratched wood floors, from using the walnut trick on surface scuffs to wood markers on minor scratches and polish on dull areas. You now have a toolbox of DIY solutions.
However, after decades in the business, we know prevention is worth a pound of cure. Simple habits like using felt pads and area rugs, regular cleaning, and trimming pet nails will save you hours of future repair work and preserve your floor’s beauty.
Of course, some damage requires professional help. For deep gouges, widespread scratches, or water damage, professional restoration is best. Our signature buff and coat process can often restore floors without the cost and disruption of a full refinishing, giving you a like-new appearance with less hassle.
Don’t let unsightly scratches bother you. Assess the damage, choose the right repair method from our guide, and take action. Your floors will thank you for it.
Ready to restore your floors to their original beauty? We’d love to help you explore your options. For a free estimate on bringing your hardwood floors back to their stunning best, schedule a free inspection with us today. We’re here to guide you through the process.