Your Guide to Flawless Floors
Replacing laminate wood planks might seem daunting, but it’s actually a manageable DIY project that can save you hundreds of dollars compared to hiring professional flooring solutions. Whether you’re dealing with water damage, deep scratches, or warped planks from that “uh oh moment” when furniture gets dropped, you can restore your floor’s beauty with the right approach.
Quick Answer for Replacing Laminate Wood Planks:
- Near a Wall: Remove baseboards, disassemble planks from the wall inward, replace damaged plank, reassemble
- Middle of Room: Cut out damaged plank with circular saw, modify replacement plank’s tongue/groove, glue in place
- Time Required: 30 minutes to 2 hours per plank for first-timers
- Essential Tools: Circular saw, pry bar, utility knife, wood glue, tapping block, safety glasses
The location of your damaged plank determines which method you’ll use. Planks near walls are easier to access by removing baseboards and working backward through the tongue-and-groove system. Planks in the middle require careful cutting and gluing techniques.
I’m David Emmerling, and with over 20 years in flooring restoration, I’ve seen countless homeowners successfully tackle replacing laminate wood planks as their first DIY flooring project. The key is understanding which method works for your situation and taking your time with each step.

Replacing laminate wood planks word roundup:
First Steps: Assessing the Damage and Gathering Your Tools
Before we dive into the exciting part of actually replacing laminate wood planks, we need to play detective first. What caused the damage? How extensive is it? And do we have everything we need to fix it properly?
Think of this step like a doctor’s examination – we need to diagnose the problem before we can treat it effectively. Skip this assessment, and you might find yourself dealing with the same issue again in a few months.

What Causes Laminate to Lift or Swell?
Understanding why your laminate flooring decided to misbehave is crucial for preventing future headaches. Laminate might look tough, but it has a few Achilles’ heels that can cause problems.
Humidity changes are probably the biggest troublemaker. Laminate flooring expands and contracts like a living thing when temperature and humidity fluctuate. If your planks weren’t given time to acclimate to your room’s conditions (manufacturers recommend 48 hours minimum), they might throw a tantrum by lifting or buckling.
Improper installation is another common culprit. Laminate is a “floating floor” that needs room to breathe. Without proper expansion gaps (typically 3/8-inch along walls), your floor literally has nowhere to go when it expands. The result? Planks that look like they’re trying to escape the room!
Water damage is the villain we see most often. Spills, leaks, or even high humidity can cause the core material to swell like a sponge. Once laminate swells from moisture, it rarely returns to its original shape – kind of like a potato chip that got soggy.
Don’t forget about subfloor issues either. An uneven, dirty, or damp subfloor creates stress points that can lead to lifting planks. Always check that your subfloor is clean, level, and completely dry before starting any repair work.
Do I Repair or Replace? Assessing the Damage
Now comes the moment of truth – can we fix this with some TLC, or is it time for surgery? The extent of damage determines whether we’re looking at a quick repair or full plank replacement.
Minor scratches and scuffs are often repairable without replacing laminate wood planks. Floor repair markers, wax filler sticks, or even a paste made from baking soda and water can work wonders on surface damage. For deeper scratches, hard resin burn-in sticks might save the day. Check out our guide on Hardwood Floor Scratch Repair for techniques that work well on laminate too.
Deep gouges or cracks that expose the core material are a different story. When damage goes beyond the surface layer, replacement usually gives you the best-looking and longest-lasting result.
Warped or swollen planks from water damage can’t be sweet-talked back into shape. While you might be able to fix minor bubbles by drying the area and applying wood glue under pressure, significant swelling means those planks have to go.
Lifting planks without swelling might just need some expansion relief. Sometimes removing baseboards to give planks more room solves the problem. If planks are loose but not damaged, wood glue and some heavy books might do the trick.
Checking for spare planks is where your past self becomes a hero. Did you keep extra boxes from the original installation? Having matching planks makes this job so much easier. If not, bring a damaged piece to your local flooring store – though keep in mind that new planks might look slightly different due to fading over time.
Essential tools for this mission include replacement planks (obviously!), a utility knife for precise cuts, a circular saw with a fine-finish blade for removing damaged sections, and a pry bar for lifting planks and removing baseboards. You’ll also need a tapping block and rubber mallet for seating new planks, wood glue specifically designed for floating floors, heavy objects to weigh down repairs while they dry, and safety glasses to protect your eyes. Don’t forget measuring tape, pencil, spacers, and blue painter’s tape for marking your work area.
With your damage assessed and tools gathered, you’re ready to restore your floor’s good looks!
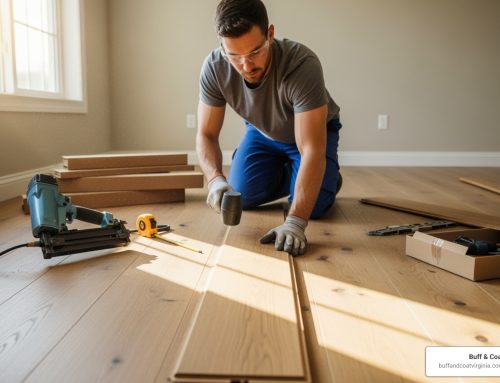
A Step-by-Step Guide to Replacing Laminate Wood Planks
Now comes the exciting part – actually replacing laminate wood planks! Think of this as floor surgery, and like any good surgeon, we need to choose the right technique based on where our “patient” is located.

The location of your damaged plank determines everything. If it’s near a wall, we can work with the floor’s natural tongue-and-groove system by disassembling from the edge. But if that troublesome plank is smack dab in the middle of your living room? We’ll need to get creative with some careful cutting and gluing.
For extensive damage or if you’re feeling overwhelmed, there’s no shame in calling for backup. A professional floor installation service can save time and ensure a perfect finish. But for those ready to tackle this DIY adventure, let’s dive in!
Method 1: Replacing Laminate Wood Planks Near a Wall
This is the “easy mode” of plank replacement. We’re working with the floor’s design rather than against it, which means less cutting and more systematic disassembly. It’s like taking apart a puzzle – just in reverse.
Start by clearing your workspace completely. Trust me, trying to steer around furniture while wielding a pry bar is a recipe for disaster (and possibly a few colorful words).
Removing the baseboards requires patience and a gentle touch. Use your pry bar or molding puller to carefully separate them from the wall. Here’s a pro tip: number each piece with painter’s tape on the back so you know exactly where each one goes back. Nothing’s more frustrating than playing “baseboard Tetris” at the end of your project.
The disassembly process is where we channel our inner archaeologist. Starting from the wall, gently lift each plank to release the tongue-and-groove connections. Work row by row, being extra careful not to snap any tongues – those little guys are what make your floor lock together perfectly.
Once you’ve reached the damaged plank, lift it out and take a moment to inspect the subfloor. This is your chance to play detective again. Is everything dry and level? Any moisture issues that caused the original damage need to be addressed now, or you’ll be right back here in a few months.
Installing the replacement plank is the satisfying part – it should drop right into place and lock securely with its neighbors. Then it’s simply a matter of reassembling everything in reverse order, maintaining that crucial 3/8-inch expansion gap along the wall with spacers.
Reattaching the baseboards is your victory lap. Use finishing nails and step back to admire your handiwork!
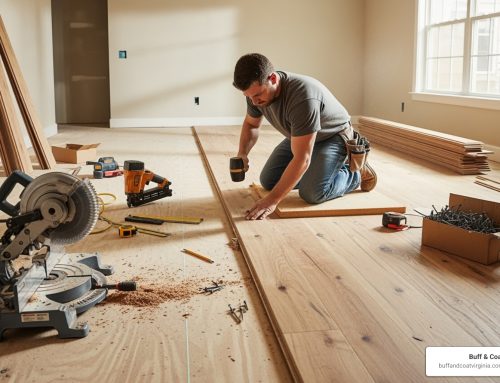
Method 2: Replacing Laminate Wood Planks in the Middle of the Floor
This method is where we earn our DIY stripes. Replacing laminate wood planks in the center of a room requires precision, patience, and a healthy respect for power tools.

Start by taping off the damaged plank with blue painter’s tape. This protects surrounding planks and gives you clear cutting guidelines. Think of it as creating a surgical field.
Setting your saw depth correctly is absolutely critical. Measure your laminate’s thickness exactly and set your circular saw blade to match. Cut too shallow and you won’t get through; too deep and you’ll damage your subfloor. We’re aiming for precision here, not power.
Making plunge cuts requires steady hands and complete focus. The safest approach is to make your initial cuts down the center of the plank to relieve pressure, then work outward toward the edges. Always wear safety glasses and position yourself to the side of the saw, never directly behind it.
For a detailed visual guide on this technique, check out this helpful resource on How to Replace Damaged Laminate Flooring Planks.
Removing the cut pieces often requires some gentle persuasion with a chisel and hammer. Work carefully to avoid damaging the locking mechanisms of the surrounding good planks.
Here’s where things get interesting: preparing your replacement plank requires some modification. Since we can’t disassemble the entire floor, we need to trim the tongue on the edges that will connect to existing planks. Use your utility knife to carefully shave off these protruding portions. Always dry-fit first – measure twice, cut once!
Applying wood glue should be done sparingly but thoroughly. Use glue specifically designed for floating floors, applying a thin, even layer to the trimmed edges. Work quickly but carefully – you’ve got a limited window before the glue starts to set.
Securing the new plank is the moment of truth. Angle it slightly as you slide it into position, then press down firmly to engage the locking mechanism. That satisfying “click” tells you everything’s aligned properly.
Weigh down your work with heavy objects – books, buckets, or even furniture (with protective pads, of course). This pressure ensures proper curing and keeps everything flat and aligned while the glue does its magic.
The whole process might take a couple of hours for your first plank, but the sense of accomplishment when you see that seamless repair? Absolutely priceless.
Finishing Touches and Preventing Future Damage
We’re in the home stretch! Once our new plank is snugly in place, we need to give it time to cure properly and then focus on keeping this problem from happening again.
Weighing down your newly installed plank isn’t optional—it’s essential for a professional-looking result. Those heavy objects we mentioned? Keep them right where they are. Stack some books, place a bucket of water (with a towel underneath to protect the floor), or even use furniture legs with protective pads. The key is consistent, even pressure across the entire plank.
Most flooring adhesives need 24 to 48 hours to cure completely. I know it’s tempting to admire our handiwork, but resist the urge to walk on the repaired area during this time. Think of it as the floor’s beauty sleep—don’t wake it up too early!
Cleaning up excess glue is much easier when we catch it early. If some adhesive has already dried (it happens to the best of us), gently scrape it off with a plastic scraper designed for laminate flooring. For stubborn urethane-based adhesives, a cloth dampened with mineral spirits can help, but don’t oversaturate the area. We want to remove the glue, not create new moisture problems.
When it comes to caulking gaps, timing and reasoning matter. If water damage caused our original problem, sealing any remaining gaps with color-matched caulk creates a protective barrier against future moisture intrusion. However, if the lifting was due to expansion issues, adding caulk might actually restrict the floor’s natural movement and cause more problems down the road. Always address the root cause first, then seal strategically.
Prevention is your best friend when it comes to avoiding future replacing laminate wood planks projects. The acclimation period isn’t just a suggestion—it’s insurance against future headaches. Always let new laminate planks sit in the room for at least 48 hours before installation. This gives the material time to adjust to your home’s temperature and humidity.
Expansion gaps are like breathing room for your floor. That 3/8-inch gap along walls isn’t wasted space—it’s what keeps your planks from pushing against each other when they naturally expand. When staggering seams during installation, keep them at least 12 inches apart from adjacent rows. This creates both visual appeal and structural stability.
Using furniture pads is like giving your furniture tiny protective slippers. These felt pads under chair legs, table corners, and heavy appliances prevent the scratches and gouges that lead to replacement projects. When moving furniture, always lift rather than drag—your floor will thank you.
Water is laminate flooring’s biggest enemy. Clean up spills immediately, use waterproof mats under pet bowls, and consider a vapor barrier in high-humidity areas or over concrete subfloors. Regular maintenance checks help catch small issues before they become big problems.
For more comprehensive floor care tips and professional maintenance advice, check out our guide on Wood Floor Repair Richmond VA. With these preventive measures in place, your newly repaired floor should serve you well for years to come.
Frequently Asked Questions about Laminate Plank Replacement
How easy is it to switch out a few planks if I have the correct ones?
Here’s the honest truth: replacing laminate wood planks is definitely doable for most DIY enthusiasts, but it’s not quite as simple as those YouTube videos make it look! If you already have the correct planks on hand, you’re ahead of the game and can tackle this as a weekend project.
For first-timers, expect to spend about 1-2 hours per plank, depending on the location and your comfort level with tools. Planks near walls are generally more forgiving since you can work with the natural tongue-and-groove system. Middle-of-the-room planks require more precision and patience with cutting techniques.
One thing that catches many homeowners off guard is color matching. Even if you have the exact same product, your new planks might look noticeably different next to older ones that have faded over time. I always recommend laying the replacement plank next to the existing floor in good lighting before you start cutting. Sometimes what looks like a perfect match in the box can stand out like a sore thumb once installed.
The difficulty level is moderate – not beginner-friendly, but certainly manageable if you’re comfortable using power tools and taking your time with measurements.
How do I fix swollen laminate flooring without replacing the entire floor?
The key here is understanding what caused the swelling in the first place. Minor swelling from humidity changes might be manageable, but significant water damage usually means replacement is your only real option.
For small bubbles or slight swelling, you can try the “surgical approach.” First, make sure the area is completely dry – use a dehumidifier if needed. Then, carefully cut a tiny slit in the swollen area with a razor knife, apply a small amount of wood glue underneath, and weigh it down with heavy books for 8-12 hours.
But let’s be realistic: for significant water damage, plank replacement is the only permanent solution. Once laminate’s core material has absorbed water and expanded, it rarely returns to its original state. Trying to “fix” severely swollen planks often results in visible bumps, gaps, and an uneven surface that’s more noticeable than just replacing the damaged sections.
The good news? You don’t need to replace your entire floor. Spot replacement of affected planks can restore your floor’s appearance and prevent the damage from spreading.
What is the safest way to use a saw to remove a damaged plank?
Safety absolutely comes first when we’re talking about power tools and replacing laminate wood planks! I’ve seen too many DIY disasters that could have been avoided with proper technique.
Use a circular or plunge saw with a fine-finish blade designed for laminate. The most critical step is setting your blade depth to the exact thickness of the laminate – usually around 8-12mm. This prevents you from cutting into your subfloor, which would create a whole new set of problems.
Here’s the technique that works best: make initial cuts down the center of the plank, not near the edges. This relieves internal pressure and makes it much easier to pry out pieces without damaging adjacent planks. Think of it like cracking an egg – you want to break the center first.
When making plunge cuts, start the saw before it touches the floor, position yourself to the side for better control, and slowly lower the spinning blade into the marked area. Never force the saw or rush the process.
Always wear safety glasses – laminate can splinter unpredictably, and protecting your eyes isn’t optional. Take your time, double-check your measurements, and remember that patience prevents both injuries and mistakes that could damage your beautiful floor.
Conclusion: Enjoy Your Restored Floors
There’s nothing quite like stepping back and admiring a floor you’ve brought back to life with your own hands! Replacing laminate wood planks might have seemed intimidating at first, but with the right approach and a bit of patience, you’ve transformed damaged areas into beautiful, seamless flooring once again.
Whether you tackled the straightforward wall-to-plank method or conquered the more challenging middle-of-the-room technique, you’ve gained valuable DIY skills and saved yourself hundreds of dollars in the process. That satisfying “click” when a new plank locks into place? That’s the sound of a job well done.
Project recap: You’ve learned to assess damage properly, gathered the right tools, and mastered both replacement methods. You’ve finded how to prevent future issues through proper acclimation, expansion gaps, and staggered seams. Most importantly, you’ve learned when to tackle repairs yourself and when it’s time to call in the professionals.
When to call a professional: While many homeowners successfully handle single plank replacements, some situations call for expert intervention. Complex damage spanning multiple rooms, extensive water damage affecting the subfloor, or full floor replacements require specialized equipment and years of experience to execute flawlessly.
For situations beyond the DIY scope, the expert team at Buff & Coat provides top-tier flooring services throughout Virginia. Our dust-free techniques and signature processes ensure your floors get the professional treatment they deserve, whether you need repairs, refinishing, or complete installations.
If you’re in the Richmond area and prefer a flawless, professional finish, we offer free estimates. Sometimes the peace of mind that comes with professional expertise is worth every penny. Contact us today to schedule a free inspection and let us handle the hard work for you.
Your floors are an investment in your home’s beauty and value. Whether you’ve completed this project yourself or decide to trust the professionals, enjoy walking on those restored, beautiful floors for years to come!