Why Hardwood Floor Installation Transforms Your Home
Hardwood Floor Installation is a valuable home improvement that combines timeless beauty with lasting durability. For homeowners in Richmond, VA, and beyond, working with the trusted experts at Buff & Coat ensures a stunning result. This guide breaks down every step, empowering you to make informed decisions, whether you’re hiring professionals or considering a DIY project.
The process involves choosing an installation method (nail-down, glue-down, or click-lock floating) and following five essential steps: planning, preparation, acclimation, installation, and finishing. While DIY is possible, most homeowners benefit from experienced hardwood flooring contractors who can avoid costly mistakes.
Average Costs:
- Solid hardwood: $5-$10 per square foot
- Engineered hardwood: $4-$9 per square foot
- Installation labor: $3-$8 per square foot
I’m David Emmerling, President of Buff & Coat Hardwood Floor Refinishing, with over 20 years of experience in Hardwood Floor Installation and restoration throughout the Richmond area. My hands-on approach ensures every project meets the highest standards, from initial planning through final inspection.
, Preparation (clearing space and subfloor prep), Acclimation (letting wood adjust 3-7 days), Installation (laying planks with proper spacing), and Finishing (baseboards and final touches) - Hardwood Floor Installation infographic")
Hardwood Floor Installation terminology:
Planning Your Project: Flooring Types, Tools, and Costs
This initial phase is critical for setting a budget and choosing materials that fit your home’s style and needs. Understanding these elements ensures you ask the right questions when getting quotes from professional flooring contractors.
Solid vs. Engineered Hardwood
Choosing between solid and engineered hardwood is a key first step. Both offer the appeal of real wood but suit different situations.
| Feature | Solid Hardwood | Engineered Hardwood |
|---|---|---|
| Lifespan | 100+ years (with proper care) | 30-50 years |
| Refinishing Capability | Multiple times | 1-3 times (depending on wear layer thickness) |
| Moisture Resistance | Less resistant; prone to expansion/contraction | More resistant due to layered construction |
| Best Installation Areas | On or above grade, over wood subfloors | On, above, or below grade, over concrete or wood |
Solid hardwood is a single piece of wood, typically 3/4-inch thick, that can be refinished multiple times over its 100+ year lifespan. However, it’s susceptible to moisture and best for areas on or above grade.
Engineered hardwood has a layered construction with a real wood veneer, making it more stable against humidity changes. It’s ideal for basements or installation over concrete, with a lifespan of 30-50 years. For detailed guidance, see our guide on installing hardwood floors over concrete.
Popular Wood Species and Their Characteristics
The wood species defines your floor’s look, durability, and price. Understanding the Janka wood hardness scale helps you choose the right species for your lifestyle.
- Oak: The most popular choice, offering excellent durability and classic grain patterns. Janka rating: ~1290 lbf.
- Maple: A sleek, modern choice with a fine, subtle grain. Harder than oak (1450-1500 lbf) but can be tricky to stain.
- Hickory: Extremely durable (Janka: 1820 lbf) with a rustic look, perfect for high-traffic areas.
- Cherry: Offers an neat, reddish-brown look that deepens over time. Softer than oak (Janka: ~950 lbf).
- Walnut: A premium choice with stunning chocolate brown tones. Softer than oak (Janka: ~1010 lbf), its dark color helps hide minor wear.
Budgeting for Your Hardwood Floor Installation
Understanding costs upfront prevents surprises. Your budget will depend on material, labor, and preparation costs.
- Material Costs: Solid wood typically runs $5-$10 per square foot, while engineered wood is $4-$9 per square foot.
- Installation Labor: Expect to pay $3-$8 per square foot for professional labor.
- Additional Costs: Subfloor preparation can add $1,000-$1,500 for major leveling, and old flooring removal costs $1-$4 per square foot.
The total cost often lands between $8-$20 per square foot. Always order 5-10% extra flooring for cuts and waste. For more details, see our guide on flooring installation costs.
Essential Tools and Materials
Having the right tools is crucial for a quality installation. Key items include:
- Materials: Hardwood planks (plus 5-10% extra), underlayment/vapor barrier, and wood putty.
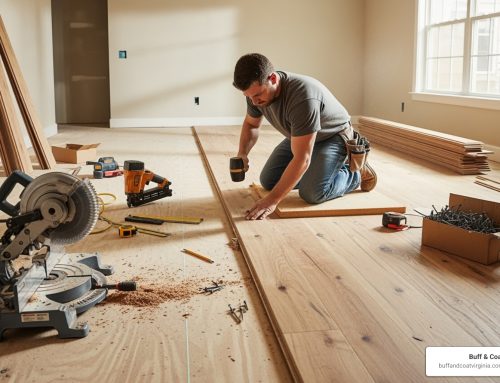
- Cutting Tools: Miter saw, table saw, and jigsaw for precise cuts.
- Measuring Tools: Tape measure and chalk line for straight guidelines.
- Installation Tools: Flooring nailer, tapping block, rubber mallet, and spacers for expansion gaps.
- Finishing & Safety: Pry bar, pull bar, safety glasses, and knee pads.
For glue-down jobs, you’ll also need the recommended adhesive and trowels. Professional installation eliminates the need to buy or rent these specialized tools.
Step-by-Step Preparation for a Flawless Installation
Proper preparation is the foundation of a successful Hardwood Floor Installation. Skipping these steps can lead to costly issues like squeaks, gaps, and buckling. This groundwork is what separates a floor that lasts for decades from one that causes headaches within months.
Preparing the Installation Space
Creating a clean, accessible workspace sets the stage for a smooth installation.

- Clear the Room: Move all furniture and belongings out of the installation area.
- Remove Old Flooring: Pull up carpet (and all staples) or carefully remove old tile or vinyl.
- Remove Trim: Gently pry off baseboards and number them for easy reinstallation.
- Undercut Door Jambs: Use a handsaw and a scrap flooring piece as a guide to cut the bottom of door casings. This allows the new floor to slide underneath for a clean, professional finish.
- Contain Dust: Seal off doorways to the work area with plastic sheeting to keep dust from spreading.
The Importance of Subfloor Preparation
Your subfloor is the foundation of your new hardwood. It must be clean, dry, level, and secure.
- Clean: Sweep, vacuum, and scrape the subfloor until it is spotless. Remove all debris, old adhesive, and protruding fasteners.
- Dry: The subfloor must be dry. For wood subfloors, moisture content should be below 12%. Use a reliable moisture meter to check.
- Level: The subfloor must be flat within 3/16 inch over a 10-foot span. Sand down high spots and fill low spots with a leveling compound.
- Secure: Walk the subfloor to find any squeaky or loose panels. Drive screws into the floor joists to eliminate movement.
This is where working with experienced Professional Wood Floor Installation specialists shows its value, as they can identify and fix subfloor issues correctly.
Acclimating Hardwood: A Non-Negotiable Step
Wood must adjust to your home’s environment before installation to prevent future gapping and buckling. This is called acclimation.
- Acclimation Period: Bring unopened boxes of flooring into the installation room for at least 3-7 days.
- Maintain Conditions: Run your HVAC system as you normally would to maintain consistent temperature and humidity (ideally 30-50%).
- Stack Properly: After the initial period, open the boxes and stack the planks with spacers between layers to allow for air circulation.
- Check Moisture: Use a moisture meter to ensure the moisture content difference between your flooring and the subfloor is no more than 4%. Rushing this step can void your warranty and lead to long-term problems.
The Hardwood Floor Installation Process Explained
From the first board to the last, the installation method requires precision. Here’s a breakdown of the techniques professionals use to achieve a seamless, durable floor.
Choosing Your Installation Method
The best method depends on your flooring type and subfloor.
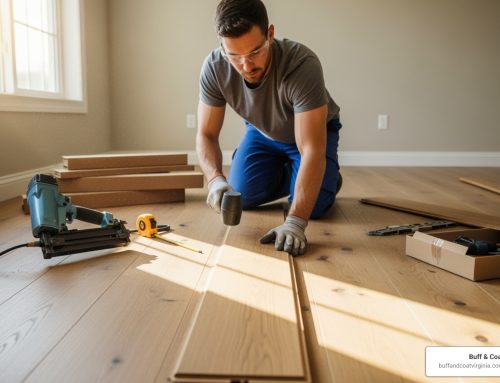
- Nail-Down Method: The traditional choice for solid hardwood over a wood subfloor. A flooring nailer drives fasteners through the board’s tongue, hiding them from view and creating a stable floor.
- Glue-Down Method: Primarily used for engineered hardwood over concrete. A specialized adhesive bonds the planks directly to the subfloor, which can also help with sound dampening.
- Click-Lock (Floating) Method: A popular, DIY-friendly method for engineered wood. Planks have a tongue-and-groove system that clicks together, allowing the floor to “float” over an underlayment.
Laying the First and Subsequent Rows for your Hardwood Floor Installation
Precision in the early stages sets the tone for the entire project.

First, plan your layout, typically laying planks parallel to the longest wall. Snap a chalk line to guide your first row, ensuring you account for a 3/4-inch expansion gap around the room’s perimeter. Use spacers to maintain this gap. The first row is usually face-nailed (nails driven through the board’s face) because a flooring nailer won’t have enough clearance.
For subsequent rows, switch to a pneumatic flooring nailer, driving nails every 6 to 8 inches along each board. It is crucial to stagger the end joints of boards in adjacent rows by at least 6 inches. This ensures structural integrity and a natural, random appearance. Mix planks from different cartons as you go to blend color and grain variations.
Making Special Cuts and Installing the Final Rows
As you progress, you’ll encounter obstacles requiring special cuts.
Use a jigsaw to cut boards to fit around floor vents and other obstacles. A table saw is best for ripping boards lengthwise to fit against walls. For the final rows where the flooring nailer no longer fits, you will need to face-nail the boards into place. A flooring pull bar is an invaluable tool for tightening the last row and ensuring a snug fit before you secure it.
Finishing, Maintenance, and Troubleshooting
The job isn’t done until the final details are complete. These last steps, along with proper care, will protect your investment for decades.
Applying the Finishing Touches
With the last board in place, it’s time for the final details that create a polished, professional look.

- Fill Nail Holes: Use color-matched wood putty to fill any visible nail holes on face-nailed boards for a seamless look.
- Reinstall Trim: Reinstall your baseboards, nailing them to the wall studs, not the floor. This is crucial as it covers the expansion gap while allowing the floor to move freely.
- Add Shoe Molding: For an extra decorative touch, add shoe molding or quarter-round trim, nailing it to the baseboard, not the floor.
- Install Transitions: Use transition strips and thresholds where your hardwood meets other flooring types (like tile or carpet) to create a smooth and safe connection.
Caring for Your New Hardwood Floors
Proper care will keep your new floors beautiful for years to come.
- Wait Before Use: Allow at least 24-48 hours for adhesives and fasteners to set before moving heavy furniture back onto the floor.
- Protect from Furniture: Apply felt pads to the bottom of all furniture legs to prevent scratches and dents.
- Clean Regularly: Sweep or vacuum (with a soft brush attachment) regularly. For deeper cleaning, use a hardwood-specific cleaner and a slightly damp mop.
- Clean Spills Immediately: Wood and standing water are not friends. Wipe up any spills right away to prevent damage.
- Maintain Humidity: Keep your home’s humidity between 30-50% year-round to prevent the wood from gapping, cracking, or warping.
- Use Rugs: Place area rugs in high-traffic areas like entryways and hallways to protect the finish. Wood floors also offer significant environmental benefits as a long-lasting, renewable resource.
Common Hardwood Floor Installation Issues
Knowing how to identify common issues can help you protect your investment.
- Gaps: Small, seasonal gaps are normal. Persistent, large gaps may indicate a humidity problem or improper acclimation.
- Squeaks: Usually caused by movement. Can sometimes be fixed by securing the board from above with a finish nail or shimming from below.
- Scratches: Minor surface scratches can often be concealed with a wood repair kit.
- Cupping or Crowning: These warping issues are caused by a moisture imbalance. The first step is always to find and fix the source of the moisture. Severe cases may require professional repair.
Frequently Asked Questions about Hardwood Floor Installation
Here are answers to the most common questions we hear from homeowners considering a hardwood floor installation.
How much does professional hardwood floor installation cost?
The total cost for professional installation typically ranges from $8 to $20 per square foot, including both materials and labor. Material costs alone are generally $4-$10 per square foot, depending on whether you choose engineered or solid wood. Labor adds another $5-$12 per square foot. Your final price will also be influenced by subfloor condition, job complexity, and local rates.
Can I install hardwood floors myself?
While some engineered click-lock systems are designed to be DIY-friendly, traditional hardwood floor installation is a challenging project that demands precision and specialized tools. Mistakes during subfloor preparation or installation can lead to costly issues like gapping, buckling, or squeaks, and may even void your material warranty. For most homeowners, hiring a professional provides peace of mind and is a worthwhile investment backed by a labor warranty.
How long does it take to install hardwood floors?
A typical project spans 1 to 2 weeks from start to finish. This timeline includes:
- Preparation: 1 day for clearing the room and removing old flooring.
- Acclimation: 3-7 days for the wood to adjust to your home’s environment.
- Installation: 1-3 days for an average-sized room (250-500 sq. ft.).
- Curing: At least 24-48 hours before moving furniture back onto the floor.
Conclusion: Get a Professional Quote for Your Project
Installing hardwood floors is a significant investment that dramatically improves your home’s value and transforms your living space. While this guide covers the essential steps, achieving a professional, long-lasting finish requires expertise, precision, and specialized equipment.
One small mistake in subfloor preparation or installation can lead to squeaks, gaps, or buckling that could cost thousands to fix later. For homeowners in the Richmond area, the team at Buff & Coat provides meticulous wood floor installation services, ensuring your new floors are both beautiful and built to last.
We handle everything from initial planning and material selection to the final cleanup, so you can focus on getting excited about your gorgeous new floors instead of stressing about the details.
To eliminate the guesswork and ensure your project is a complete success, we encourage you to schedule a free, no-obligation inspection. Our experts will assess your space, discuss your vision, answer all your questions, and provide a detailed, free estimate custom to your home’s needs.
Ready to take the next step? Contact us today to schedule your free inspection and let’s start planning the hardwood floors you’ve been dreaming about.