Why Glueing Hardwood to Concrete is a Smart Choice
Glueing hardwood to concrete is an excellent way to transform a cold, utilitarian slab into a warm, beautiful living space. For homeowners seeking professional hardwood flooring services, this installation method provides superior stability and eliminates the hollow sound common with floating floors, creating a solid, high-quality feel underfoot. The key to success lies in meticulous preparation and using the right materials. When you get the details right, a professional hardwood floor installation over concrete delivers stunning results that last for decades.
Quick Answer: Can You Glue Hardwood to Concrete?
- Yes – Both engineered and solid hardwood can be glued directly to a concrete slab.
- Best Choice: Engineered hardwood is highly recommended for its stability and moisture resistance.
- Key Requirements: The concrete must be clean, level (within 3/16″ over 10 feet), and dry (4% moisture or less).
- Adhesive: Use a quality urethane-based adhesive, preferably one that also acts as a vapor barrier.
I’m David Emmerling, and with over 20 years of experience in hardwood flooring, I’ve seen how a proper glue-down installation creates a floor that maintains its beauty and integrity for years.

Solid vs. Engineered Hardwood: Which is Right for Concrete?
When glueing hardwood to concrete, your choice between solid and engineered hardwood is critical. While both are technically possible, engineered hardwood is the clear winner for concrete subfloors due to its superior stability.
Engineered hardwood is constructed with a real hardwood veneer over a multi-layered plywood core. This cross-layered design gives it exceptional dimensional stability, making it highly resistant to the expansion and contraction caused by humidity changes. In contrast, solid hardwood is a single piece of wood that is much more susceptible to moisture, making it a risky choice for direct glue-down on concrete, especially in below-grade installations like basements.
| Feature | Solid Hardwood | Engineered Hardwood |
|---|---|---|
| Stability | Less stable; expands and contracts with humidity | Highly stable; plywood core resists movement |
| Cost | Higher upfront cost, multiple refinishing options | Often more affordable, 1-2 refinishing cycles |
| Installation Method | Risky for direct glue-down; often needs plywood subfloor | Perfect for glue-down over concrete |
| Refinishing Potential | Can be refinished many times over its lifetime | Limited refinishing based on wear layer thickness |
For homeowners exploring wood flooring options in Richmond VA, engineered hardwood is often preferred for concrete slabs. Its resilience against humidity makes it suitable for basements, and manufacturer warranties frequently cover this specific installation method.
So, can you glue solid hardwood to concrete? Yes, but it’s not recommended. The natural movement of solid wood can lead to cupping, gapping, or adhesive failure against a rigid concrete slab. The risk is even greater with wider planks. A successful installation requires a robust moisture barrier and perfect conditions, making it a job best avoided by most. For a deeper dive, see our post on installing solid wood on concrete.
Pre-Installation Essentials: Preparing Your Concrete Slab
Properly glueing hardwood to concrete depends almost entirely on the preparation of your concrete slab. A successful, long-lasting floor starts with a subfloor that is perfectly clean, flat, and dry. Skipping these steps is the number one cause of flooring failure.

A Clean, Dry, and Flat Slab is Non-Negotiable
Before installation, your concrete must meet three critical standards as outlined in the NWFA technical guidelines:
- Clean: The slab must be free of all dirt, paint, oil, and old adhesive. This requires thorough sweeping, vacuuming, and degreasing to ensure a strong adhesive bond.
- Dry: Moisture is wood’s worst enemy. We use a Tramex moisture meter to confirm the slab has 4% moisture content or less. A calcium chloride test can also be used to check vapor emissions. New concrete must cure for at least 60-90 days.
- Flat: The flatness tolerance is a maximum variation of 3/16 inch over a 10-foot span. High spots must be ground down, and low areas filled with a high-strength self-leveling compound (over 3000 psi). An uneven surface leads to hollow spots, squeaks, and loose boards.
Moisture Mitigation: Your First Line of Defense
Even a dry slab can transmit moisture vapor over time. A moisture mitigation system is your best defense. Many modern urethane-based adhesives also function as vapor retarders. For added protection, especially with higher moisture readings, consider these options:
- Liquid-Applied Membranes: Products like Bostik MVP4 create a seamless, impermeable barrier.
- Penetrating Sealers: Silicate sealers or epoxy sealers from brands like DriTac and Franklin penetrate the concrete to block moisture from within.
- Polyethylene Film: A traditional 6-mil polyethylene film can be used, though liquid membranes are often preferred for their seamless coverage.
For more on preparing your foundation, see our guide on residential concrete flooring.
The Ultimate Guide to Glueing Hardwood to Concrete
With a perfectly prepped slab, you’re ready for the installation. The glue-down method provides a solid feel underfoot and eliminates the hollow sound of floating floors.

Choosing the Right Adhesive
The adhesive is the hero of a glue-down installation. Urethane-based adhesives are the industry standard for glueing wood to concrete. Unlike water-based products, they don’t introduce moisture into the wood and remain flexible after curing, allowing for natural wood movement. High-quality moisture-cure urethane adhesives from brands like Bostik Pro-Cure, Loctite PL Premium, and Franklin Titebond often act as an all-in-one system, providing both a powerful bond and a moisture barrier.
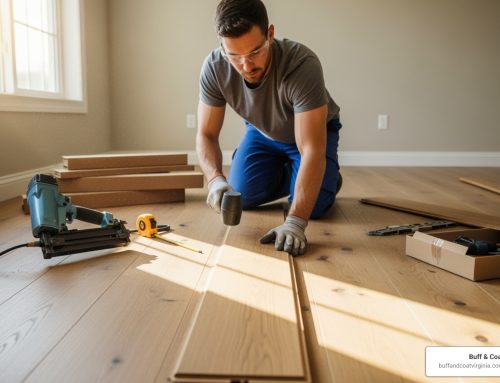
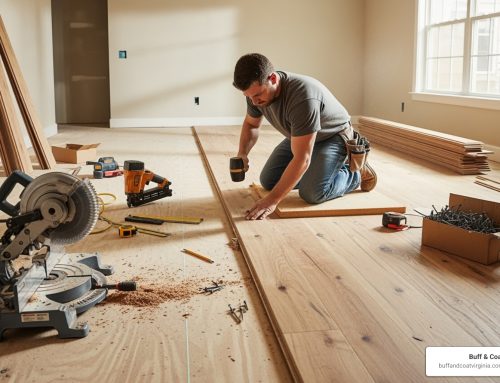
Step-by-Step Installation Process
Precision and patience are key. Here is a summary of the professional workflow for glueing hardwood to concrete:
- Acclimate the Wood: Let the hardwood planks sit in the installation room for 2-3 days to adjust to the home’s temperature and humidity. The moisture difference between the wood and subfloor should be within 4% for narrow planks (<3″) and 2% for wider planks.
- Establish Layout: Snap chalk lines to create a straight guide for your first row. A well-planned layout is essential for a professional look.
- Spread the Adhesive: Using the notched trowel specified by the adhesive manufacturer, spread the glue over a small, manageable area that you can cover with flooring in about 60 minutes. Spreading too much at once can cause the adhesive to “skin over” and create a weak bond.
- Set the Planks: Press the first row of planks firmly into the adhesive along your chalk line. Use a tapping block to ensure tight joints. Stagger the end joints of subsequent rows by at least 6 inches for strength and visual appeal. Use painter’s tape to hold joints tight as you work.
- Roll the Floor: This step is critical. Immediately after installing a section, roll it with a 100-pound roller. This ensures full adhesive transfer from the concrete to the plank, eliminating air pockets and creating a solid bond.
- Allow for Curing: Respect the curing time. Do not walk on the floor for at least 24-48 hours, and wait to move furniture back according to the adhesive manufacturer’s instructions (often up to 72 hours).
This level of precision is why many homeowners trust professionals to ensure the project is done right from start to finish.
Common Challenges and Pro Solutions
Even with careful planning, issues like gaps, cupping, or hollow spots can arise when glueing hardwood to concrete. Most problems are preventable and stem from mistakes in preparation or installation.

Troubleshooting a Weak Bond
A weak bond is often caused by one of these issues:
- Improper Trowel Size: Using the wrong notch size results in too little adhesive. Always follow the manufacturer’s specifications.
- Adhesive “Skinning Over”: Spreading too much adhesive at once allows it to dry before the planks are set. Work in smaller, manageable sections.
- Contaminated Slab: Any dust, oil, or debris will prevent a strong bond. The slab must be perfectly clean.
- Insufficient Rolling: Skipping or rushing the 100-pound roller step prevents full adhesive contact.
Managing Wood Expansion and Contraction
Wood naturally moves with humidity changes. To manage this:
- Prioritize Acclimation: Never skip the 2-3 day acclimation period. This allows the wood to stabilize to your home’s environment.
- Maintain Consistent Humidity: Keep your home’s humidity between 35-55% year-round to prevent shrinking or swelling.
- Leave Expansion Gaps: A gap around the perimeter of the room is essential, even for glue-down floors. Baseboards will cover this gap, giving the floor room to breathe.
Frequently Asked Questions about Glueing Hardwood to Concrete
Here are answers to the most common questions we get about glueing hardwood to concrete.
How long does it take for flooring adhesive to cure on concrete?
Cure time has two stages. The initial set time is typically 20-30 minutes, allowing for minor adjustments. The full cure time, when the adhesive reaches maximum strength, is much longer. Plan to stay off the floor for at least 24-48 hours. Moving furniture back may require up to 72 hours. Cure times are affected by temperature and humidity and vary by product, so always check the manufacturer’s instructions.
Can I glue down hardwood flooring over painted or sealed concrete?
No. Adhesive bonds to the paint or sealer, not the concrete itself. This bond is weak and will eventually fail. These coatings can also trap moisture, leading to wood damage. All existing coatings must be mechanically removed by grinding or shot blasting to expose a clean, porous concrete surface for proper adhesion.
What is the best way to ensure a long-lasting bond?
A durable, long-lasting bond comes down to three key principles:
- Meticulous Subfloor Prep: The concrete must be perfectly clean, flat (within 3/16″ over 10 feet), and dry (4% moisture or less).
- Quality Materials: Use a professional-grade urethane adhesive that includes a moisture barrier.
- Correct Technique: Follow all manufacturer instructions for acclimation, trowel size, and rolling with a 100-lb roller. There are no shortcuts to a successful installation.
Achieve Flawless Floors with Professional Installation
Glueing hardwood to concrete offers a stable, solid, and beautiful flooring solution. As we’ve covered, success depends on meticulous preparation—from ensuring the slab is dry and flat to choosing the right urethane adhesive and acclimating the wood.
While it’s possible to DIY, the process is complex and unforgiving. A small mistake in grinding, leveling, or adhesive application can lead to costly failures like cupping, gaps, or a weak bond. The long-term durability of your investment relies on getting every detail right.
At Buff & Coat, we specialize in crafting lasting beauty through expert hardwood installations in the Richmond, Virginia area. We understand the nuances of our local climate and use proven techniques to ensure your floor stands the test of time. Our professional expertise shows in every perfectly aligned plank and seamless joint.
For a perfect finish that turns a complex process into a stress-free change, trust our experienced team. Contact us today to schedule a free inspection and get a free, detailed estimate for your project.