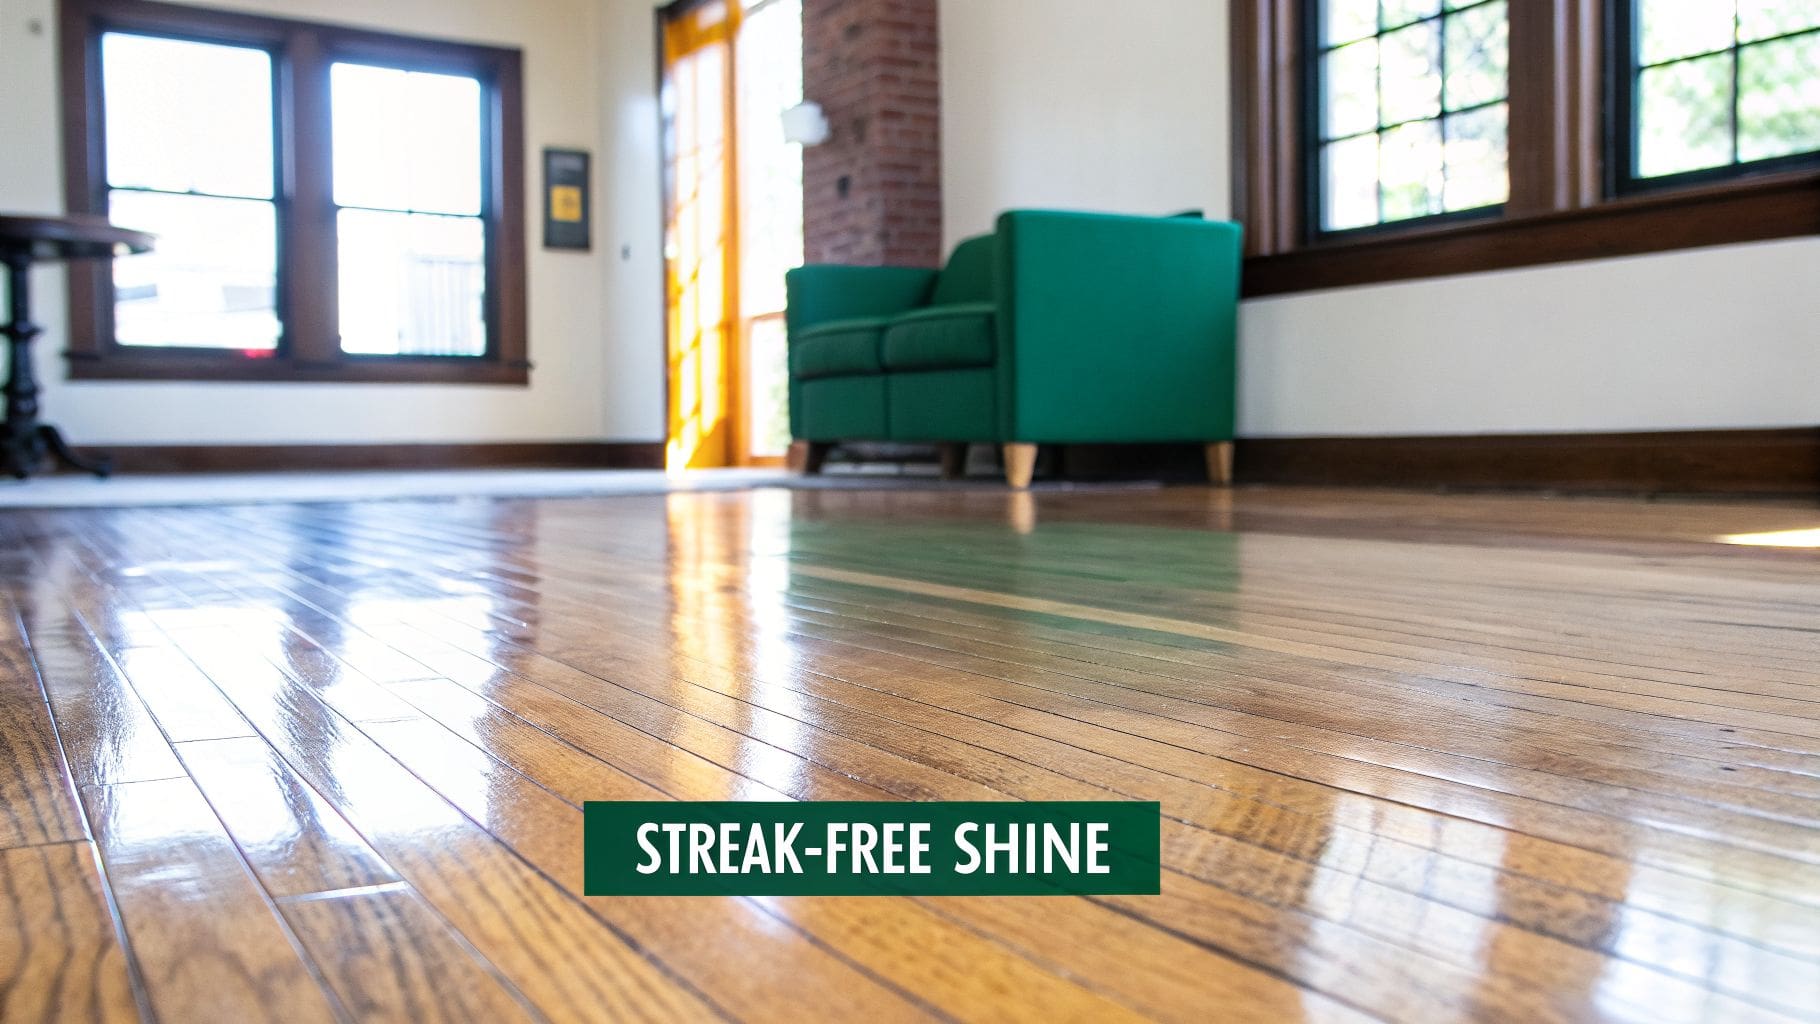
For many Richmond homeowners, achieving a perfect, streak-free shine on hardwood floors isn't about scrubbing harder—it's about using the right technique with the right tools. The combination of a microfiber mop, a pH-neutral cleaner, and a “barely damp” approach stops streaks before they start and protects your wood for the long haul.
Why Your Hardwood Floors Look Streaky After Cleaning
You’ve spent time carefully mopping, only to step back and see a hazy, streaked mess. It's a frustratingly common problem for homeowners across Richmond and Henrico, but the good news is that the fix is usually simple. You don't need expensive gadgets or back-breaking effort.
Streaks are almost always caused by one of these three culprits:
- The Wrong Cleaning Solution: All-purpose cleaners, oil soaps, or any product with wax are notorious for leaving behind a sticky, dull film. This residue is what causes streaks and, worse, it actually attracts more dirt.
- Too Much Water: A traditional string mop is your floor’s enemy. It completely oversaturates the wood, allowing dirty water to pool and dry unevenly. The result is a map of streaks and potential water damage.
- Spreading Dirt Around: If you don’t get all the dust, pet hair, and debris off the floor before you mop, you’re just creating a muddy slurry. You end up smearing that grime right back across the surface.
Pro Tip: The goal is to lift dirt off the floor, not just push it around. Always start with a thorough vacuuming or dry dusting. This one simple step prevents 90% of streaking issues before your mop even gets wet.
Understanding these common mistakes is the first step toward that flawless shine you’re after. Proper cleaning is a cornerstone of good floor care, and for more long-term strategies, be sure to check out our complete guide on how to maintain hardwood floors.
Choosing Your Cleaning Arsenal: The Right Tools and Solutions
The secret to a streak-free clean isn’t about more elbow grease—it’s about having the right tools in your cleaning kit. As a local floor refinishing company in Richmond, we can't tell you how many times homeowners tell us they see smudges and haze right after they finish mopping. The culprit, almost every time, is the wrong mop or an incompatible cleaner.
Let’s start with what to ditch. Throw out your old-school string or sponge mops. They’re designed to hold a ton of water, which is the last thing you want on a hardwood floor. They dump too much liquid, leading to those streaky, uneven drying patterns, and quickly get so full of grime that you’re just spreading a thin layer of dirt around.
Your Must-Have Mopping Tool
For hardwood floors, the undisputed champion is a flat-head microfiber mop. There’s a good reason we professionals swear by them.
- Controlled Moisture: The thin pad doesn’t get oversaturated. This lets you clean with that "barely damp" method that’s crucial for protecting your wood finish.
- Superior Dirt Trapping: Microfiber is like a magnet for dust, pet hair, and dirt. It uses an electrostatic charge to grab and hold onto particles instead of just pushing them across the floor.
- Reusable and Efficient: Most pads are machine washable, making them a cost-effective and smart choice for the long haul.
For even more convenience, you might consider a mop with disposable pads for streak-free floors. This can be a great way to prevent any chance of spreading dirt from one room to another.
Picking the Perfect Cleaning Solution
The cleaner you pair with your mop is just as critical. Many all-purpose cleaners, or anything with oils, waxes, or ammonia, will absolutely leave behind a film. This residue not only dulls your floor's finish but also acts like a dirt magnet, making your floors get dirty faster.
You should always reach for a pH-neutral, water-based cleaner made specifically for hardwood. These formulas are gentle enough to protect the polyurethane finish while still being tough enough to dissolve dirt without leaving that dreaded film. If you want a deeper look at our top product picks, we put together a complete guide on the best wood floor cleaners we trust on the job.
As you decide what's best for your home, it helps to see a direct comparison between homemade solutions and professional-grade products.
DIY vs. Professional Hardwood Floor Cleaners
| Cleaner Type | Pros | Cons & Risks | Best For |
|---|---|---|---|
| DIY (Vinegar & Water) | – Very inexpensive – Easily accessible ingredients – Can cut through some built-up residue |
– Acidic: Vinegar can dull and slowly break down polyurethane finishes over time – Not effective on grease or oily dirt – Can leave a dulling haze if the ratio is wrong |
A one-time deep clean to strip away old, waxy product buildup from other cleaners. Not for regular use. |
| Professional (pH-Neutral) | – Specifically formulated to protect polyurethane finishes – Dries quickly without leaving streaks or residue – Safely lifts dirt, dust, and grime |
– Higher upfront cost compared to DIY – Must purchase from a store or online |
Regular weekly or bi-weekly cleaning to maintain the floor’s shine and protect the finish. The safest and most effective option. |
While a homemade cleaner might seem tempting, the long-term risk to your floor's finish just isn't worth it for routine cleaning.
A Note on DIY Cleaners
A common piece of advice is to use a weak vinegar-and-water mix (maybe a half-cup of vinegar to a gallon of water). While this can sometimes cut through residue from other bad cleaners, it comes with a serious warning: vinegar is acidic. Over time, that acid will slowly eat away at and dull your floor’s modern polyurethane finish. We only ever suggest it for a one-off deep clean to strip old residue, never for regular maintenance.
Our Proven Process for a Flawless Floor Clean
Getting that perfect, streak-free shine isn't about aggressive scrubbing or spending hours on your hands and knees. It’s all about a smart, methodical process that stops streaks before they can even start. This isn't just a mopping guide—it’s the full technique we use as professionals, and it starts with prep work you can't afford to skip.
Start with a Thorough Dry Clean
Here's where most people go wrong. If you try to mop a floor that’s still covered in dust, pet hair, or tiny bits of grit, you’re not really cleaning. You’re just making a muddy mess that your mop smears across the surface. This is the #1 cause of that hazy, streaky finish we all hate.
Before you even think about getting the floors wet, you have to get all that loose debris up. Your best friends for this job are:
- A Vacuum with a Soft-Bristle Head: Make sure you’re on the hardwood floor setting or using an attachment with soft bristles to avoid scratching your finish. Get right into the corners and along the baseboards—that’s where dust loves to hide.
- A Microfiber Dust Mop: For daily touch-ups or a final pass after vacuuming, nothing beats a microfiber dust mop. It uses an electrostatic charge to grab and trap fine dust particles instead of just pushing them around.
Master the Mopping Technique
Once your floor is totally clear of debris, it’s time to mop. But there’s a right way and a wrong way to do it.
First things first: spray the cleaner directly onto your microfiber mop pad, not all over the floor. Dousing the floor itself leads to too much liquid, which causes puddling and uneven spots. A light mist on the pad until it's just damp is all you need.
Next, always mop with the grain of the wood. Follow the direction of the planks. This simple trick helps hide any faint moisture lines and keeps the cleaner from seeping into the seams between boards.
Finally, work in small, manageable sections, like a 4×4 foot area, at a time. Mop and complete one section before moving on. This system ensures an even dry and prevents you from leaving footprints on a still-damp spot.
The "Barely Damp" Rule: Your mop pad should feel damp to the touch, but never wet enough to leave visible puddles or water droplets. If you see water left behind, your mop is too wet. This is a fast track to streaks and, over time, can cause serious water damage to your beautiful hardwood.
This simple three-step method is the core of a professional-level clean that any homeowner can master.

As you can see, the actual mopping is the last step. The real secret to a streak-free shine is in the prep work.
Troubleshooting Common Causes of Streaks and Haze
You’ve done everything right—followed the steps, used the right cleaner, and even mopped with the grain. But when the afternoon sun hits the floor, you see it: a frustrating, hazy film or those dreaded streaks. It's a common problem, so don't throw in the towel just yet. It just means we need to play detective for a minute.
When streaks are this stubborn, it’s usually not your mopping technique. It’s almost always an underlying issue. These are the most common culprits we see in homes from Midlothian to Mechanicsville.
The Real Problem Is Often Product Buildup
By far, the number one reason for a hazy floor is residue from old cleaning products. If you've ever used an oil soap (like Murphy), a wax-based polish, or even a multi-surface cleaner on your hardwoods, it has likely left behind a sticky, invisible film.
Each time you mop, you're just reactivating that old residue and smearing it around. It's a frustrating cycle of streaks that never seems to end.
To fix this, you need to strip that buildup. Try mopping a small, out-of-the-way test spot with a simple mix of 50% white vinegar and 50% water. This mild acid is fantastic at cutting through old waxes and oils. If the haze disappears in your test spot, you've found the culprit. You can then carefully clean the entire floor with this mixture one time only.
Follow up immediately with a final pass using a clean mop dampened with only plain water. This will neutralize any remaining vinegar and remove the last of the gunk.
A Word of Caution: This vinegar solution is a one-time reset for your floors, not a regular cleaning solution. Using acidic cleaners like vinegar repeatedly will eventually eat away and dull your floor's protective polyurethane finish. Once the old residue is gone, go back to your pH-neutral cleaner for good.
Could It Be Your Mop or Your Water?
Another sneaky cause is simply a dirty mop head. Even if it looks clean, a microfiber pad can hang onto fine dirt and oils from the last time you used it. To be safe, always start with a completely fresh, clean pad for every single mopping session.
Here in the Richmond area, our hard water can also be a factor. The high mineral content in tap water, like calcium and magnesium, can get left behind as the water evaporates. This creates a faint, chalky film that looks a lot like haze.
If you think this is your issue, try using distilled water for your cleaning solution or at least for the final rinse. Because it has zero mineral content, distilled water evaporates cleanly, leaving nothing behind but a beautiful, streak-free shine.
If you’ve tried all these troubleshooting steps and the dullness or streaks still won't budge, the problem might not be dirt at all. It could be a sign that your floor’s protective finish has worn down and needs professional help.
Still seeing streaks? It might be time for a professional opinion. Buff & Coat can take a look and give you honest recommendations. Call us at 804-392-1114.
When Cleaning Isn’t Enough: Recognizing a Worn Finish
Have you tried every trick in the book, but your hardwood floors still look stubbornly dull, hazy, or streaky? If so, the problem might not be dirt at all. Sometimes, no amount of cleaning can fix an issue that isn't on the surface. These persistent problems are often a clear signal that your floor’s protective polyurethane finish is wearing thin.
Think of that finish as your floor’s armor. It takes the daily abuse of foot traffic, spills, and scuffs so the beautiful wood underneath doesn’t have to. But over the years, this armor naturally wears down, especially in high-traffic spots like hallways, entryways, and kitchens.
Dirty Floor vs. Damaged Finish
So, how can you tell the difference? A dirty floor often feels a bit sticky or looks streaky only in certain lighting, and a good deep clean will usually solve it. A floor with a worn finish, on the other hand, looks consistently lifeless no matter how much you scrub. It may also show scuffs and light scratches far too easily.
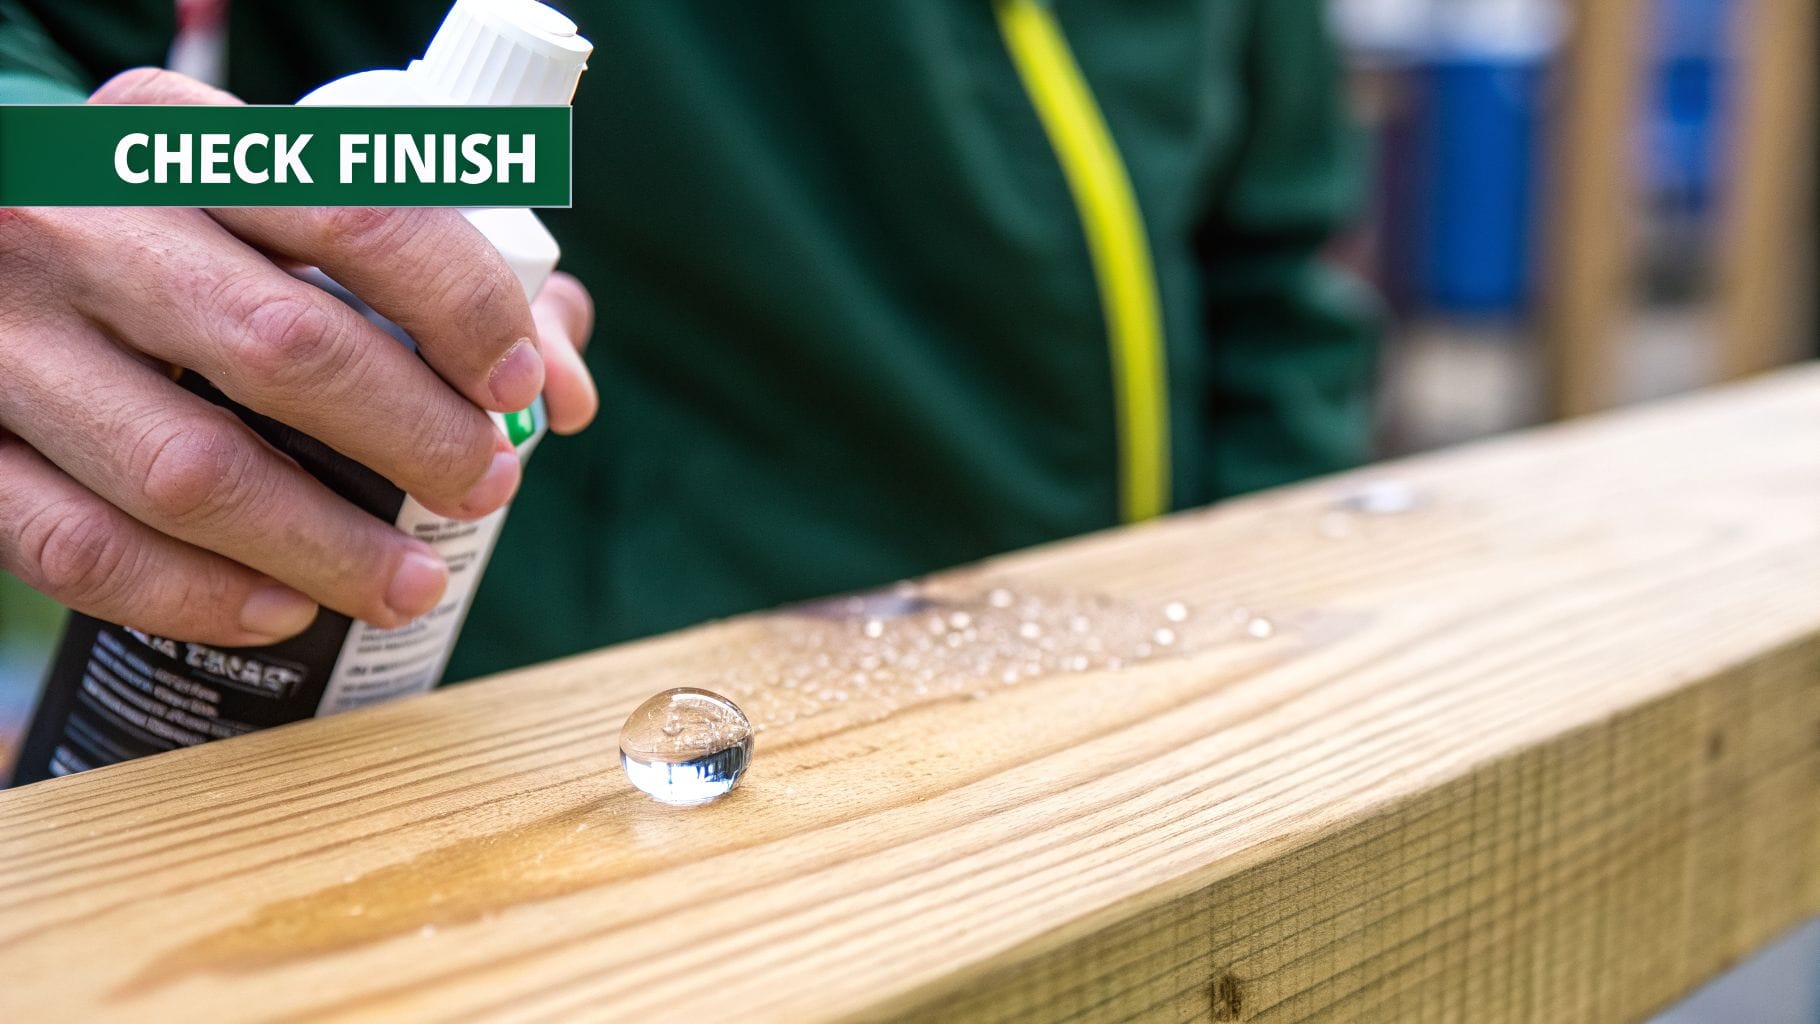
Here’s a simple test we use to check a finish's integrity:
The Water Drop Test: Place a single drop of water on a busy area of your floor. If the droplet beads up nicely, your finish is still doing its job. But if it soaks into the wood within a few minutes or leaves a dark spot, your protective layer is gone. This leaves the raw wood exposed and vulnerable.
If your floor fails the water drop test, it’s time to stop mopping and start thinking about hardwood floor restoration. At this point, more cleaning will only cause more harm as moisture seeps directly into the wood grain.
Restoring Your Floor’s Protective Layer
When the finish is compromised, the only real solution is professional restoration. This doesn’t always mean a full, messy sanding project that disrupts your entire home.
For floors with a worn-out topcoat but otherwise healthy wood, our dustless buff and coat service is the perfect answer. We lightly abrade (or "screen") the old, tired surface to smooth out minor scuffs and create a strong bond for the new finish. Then, we apply a fresh, durable coat of commercial-grade polyurethane.
This process restores that essential protective barrier, bringing back the rich color and smooth, even sheen your floors once had. Best of all, once it's done, your regular cleaning routine will be simple and effective again.
To see exactly how we bring worn floors back to life, you can explore our guide on hardwood floor screening and recoating.
If your floors look tired no matter what you do, give Buff & Coat a call at 804-392-1114. We offer honest advice to Richmond homeowners and can help you determine the best path forward.
Why Richmond Homeowners Choose Buff & Coat
Sometimes, no matter how much you clean, your hardwood floors just don't have the shine they used to. When the streaks and dullness won't go away, it’s a sign your floors need more than just maintenance. That’s where we come in.
For over 15 years, Buff & Coat has been the go-to local expert for homeowners across the Richmond area, from Chesterfield to Glen Allen. We're not a big, faceless franchise; we’re your neighbors, dedicated to honest advice and quality workmanship.
We've built our reputation by giving clear, straightforward solutions that fit your floor's specific condition. For those thinking about putting their home on the market, keeping the floors pristine is one of the smartest moves you can make and a key part of how to sell a house faster.
We believe in doing the job right, with no shortcuts. Our owner is on-site for projects, ensuring every detail meets our high standards.
Here’s why so many Richmond homeowners trust us with their floors:
- 15+ Years in Business: We are deeply rooted in the communities we serve, from Richmond to Midlothian and Short Pump.
- Dustless Sanding Systems: We use advanced equipment that keeps your home clean and the air healthy during the refinishing process.
- Local, Owner-Operated: We're your neighbors, not a national chain. You get personalized service and accountability.
- High-Quality Finishes: We only work with durable, low-odor products that stand up to daily life and protect your investment.
- Clear Pricing and Honest Advice: You’ll get a recommendation that makes sense for your floors and your budget, never an upsell.
- 5-Star Customer Service: Our goal is to make the entire process easy and stress-free, from the first call to the final walkthrough.
Frequently Asked Questions
Even with the best technique, questions always pop up. We hear them all the time from homeowners around the Richmond area, so we’ve put together answers to a few of the most common ones.
How often should I deep clean my hardwood floors?
For most homes, a true deep clean is only necessary every 1-2 months. The real secret to beautiful floors isn't the occasional deep clean—it's the daily and weekly upkeep. Sweeping or vacuuming (with a soft brush head, of course) a few times a week is what prevents abrasive grit from causing hardwood floor scratch repair issues in the first place.
Can I use a steam mop on my hardwood floors?
Please don't. As the best hardwood floor contractor in Richmond, we strongly advise against using steam mops on any kind of hardwood floor, no matter what the box says. The combination of intense heat and moisture is a recipe for disaster. It forces water deep into the seams of the boards, which can permanently damage both the wood and its protective finish. Using one will often void your floor's warranty and can cause harm that can't be undone.
My floors are still hazy after cleaning. What's wrong?
That frustrating, persistent haze almost always points to one of two things: residue buildup or a worn-out finish. Often, the culprit is using the wrong type of cleaner over time, like an oil soap that leaves a film. You can try a simple spot test: wipe a small area with a cloth lightly dampened with a 50/50 mix of white vinegar and water. If this trick cuts through the haze, residue is your problem.
If the haze remains, it's a strong sign that the protective polyurethane coat itself is compromised. At that point, no amount of cleaning will fix it. The finish has worn away and needs professional attention, like our wood floor recoating service, to be restored.