Why Buffing a Hardwood Floor is Your Best Bet for Floor Restoration
Buffing a hardwood floor is a cost-effective way to restore shine and remove surface scratches without the expense and mess of full sanding. For homeowners seeking top-tier hardwood floor care in Richmond, this process uses a floor buffer with abrasive screens to lightly sand the existing finish, creating a smooth surface for a fresh protective coat.
Quick Answer: How to Buff a Hardwood Floor
- Clean the floor thoroughly and remove all furniture
- Attach a 120-grit screen to your rented floor buffer
- Buff in overlapping passes moving side-to-side across the room
- Vacuum all dust and clean with a tack cloth
- Apply a thin coat of polyurethane finish with a roller
- Allow 24 hours to dry before normal use
If your hardwood floors are dull but not severely damaged, buffing might be your solution. Professionals typically charge $1 to $2.50 per square foot for buffing, but renting a buffer for under $50 per day makes this an attractive DIY project.
Unlike full sanding that removes the entire finish and part of the wood itself, buffing only addresses the top protective layer. This makes it perfect for floors with minor surface scratches, dullness, or light scuffs. However, if you have deep gouges, water stains, or worn-through finish, you’ll need our professional hardwood floor refinishing services instead.
I’m David Emmerling, President of Buff & Coat. With over 20 years of experience buffing hardwood floors for homeowners in the Richmond area, I know that proper technique and quality materials are key to a professional-looking finish.

Simple guide to buffing a hardwood floor terms:
Buffing vs. Sanding: Choosing the Right Method for Your Floors
When hardwood floors look tired, you must decide: buff the hardwood floor or sand it? The choice depends on the level of damage.
The key difference comes down to how deep the damage goes. Buffing works on surface-level issues by lightly abrading the existing polyurethane finish and applying a fresh protective coat. Sanding, on the other hand, strips everything away—finish, stain, and even some wood—to address deep gouges and serious wood damage.
Here’s how these two approaches stack up:
| Feature | Buffing (Screen & Recoat) | Sanding (Full Refinishing) |
|---|---|---|
| Cost (DIY) | Under $150 total | $300-500+ in materials |
| Cost (Professional) | $1-2.50 per sq ft | $3-8 per sq ft |
| Time Required | 1 day | 3-5 days |
| Skill Level | Beginner-friendly | Advanced technique needed |
| Best For | Surface-level scuffs, dull finish | Deep gouges, water damage, color changes |
For a more detailed breakdown of these methods, check out this comprehensive comparison from HGTV. Our professional buff and coat process is specifically designed to work with existing finishes, whether you have traditional polyurethane, aluminum oxide coatings, or even older wax finishes (though wax requires special preparation).
When Buffing is the Right Choice
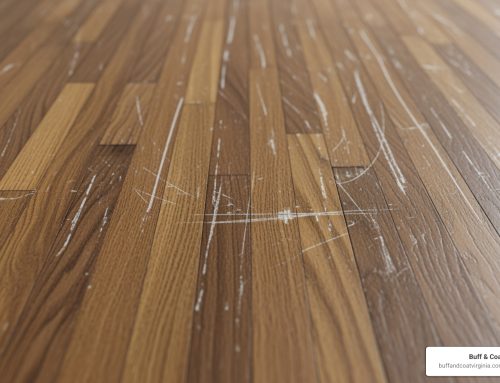
Buffing is the perfect maintenance for floors with a dull finish and minor scratches from daily life, as long as the underlying wood is solid. It’s ideal for marks that haven’t penetrated to the wood.
If your polyurethane is still intact (the surface feels smooth, even if dull), it’s a perfect candidate for buffing. This makes it an excellent choice for routine maintenance every few years.
From a practical standpoint, buffing offers cost-effective restoration that won’t break the bank. Whether you tackle it yourself or hire professionals, it’s a fraction of the cost of full refinishing. Plus, it’s one of the fastest ways to boost your home’s appeal. A simple buff and coat can make a space feel much brighter and more welcoming.
When You Need to Sand Instead
Sometimes, floors need more than surface-level help. Sanding becomes necessary when you’re dealing with a worn-through finish—those gray, unprotected patches where the wood is exposed to daily wear and moisture.
Deep scratches or gouges that catch your fingernail are beyond buffing’s reach. These require removing actual wood to create a smooth surface again. The same goes for water damage and pet stains that have soaked deep into the wood fibers, creating discoloration that no amount of surface work can fix.
If you’re dreaming of changing your stain color—maybe going from honey oak to a rich espresso—you’ll need to sand down to bare wood first. Buffing only refreshes what’s already there.
For situations where sanding is unavoidable, consider our dustless sanding alternative. It dramatically reduces the mess while delivering the deep restoration your floors need.
The bottom line? Most floors that still look like wood can benefit from buffing. When in doubt, a quick inspection can save you time and money by pointing you toward the right solution.
Your Step-by-Step Guide to Buffing a Hardwood Floor
Ready to transform your tired floors? Buffing a hardwood floor is more manageable than you think. With the right approach and patience, you can achieve a professional restoration. Success lies in preparation and attention to detail, so let’s walk through the process step-by-step.

Before you dive in, gathering your supplies is crucial. Here’s what you’ll need for a successful buffing project:
Equipment: You’ll rent a floor buffer (spray buffers are easier for beginners), plus you’ll need 120-grit screening pads for abrading and white polishing pads for finish application. Safety gear is non-negotiable – dust mask, safety glasses, gloves, knee pads, and ear protection will keep you comfortable and safe.
Cleaning supplies include a soft-bristled broom, shop vacuum, microfiber mop, two buckets, and pH-neutral hardwood floor cleaner (avoid anything with wax, oil, or silicone). You’ll also need tack cloths or lint-free rags for the final dust removal.
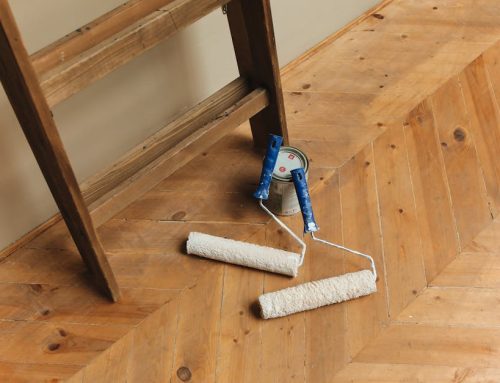
For the finishing work, choose a high-quality polyurethane finish and the right applicator – either a T-bar applicator, roller, or appropriate brush. Don’t forget painter’s tape and plastic sheeting to protect your baseboards, plus a putty knife, wood filler, and fine-grit sandpaper for any minor repairs.
Step 1: Prepare the Room and Floor
Proper preparation is critical, as any shortcuts will show in your final results.
Remove everything from the room first. Every piece of furniture, rug, and decorative item needs to go. This gives you complete access and prevents accidental damage.
Next, inspect your floors. Walk around slowly, looking for protruding nails to hammer down, loose boards to secure, or significant gouges. Small holes and deep scratches should be filled with wood filler now—let it dry completely and sand it smooth. Buffing won’t fix these issues, so address them before you start.
Thorough cleaning is your next mission. Start by sweeping or vacuuming all loose dirt and dust. Then, mop with a cleaner specifically designed for wood floors. Avoid products like Murphy’s Oil Soap or Pledge, as their wax, oil, or silicone content prevents the new finish from adhering.
Use a barely damp microfiber mop. Excess water is hardwood’s worst enemy and can cause cupping or warping. Think “damp,” not “wet.”
Allow complete drying time before proceeding. Your floor must be completely dry. Depending on humidity, this could take several hours. While you wait, protect your baseboards with painter’s tape and hang plastic sheeting over doorways to contain dust.
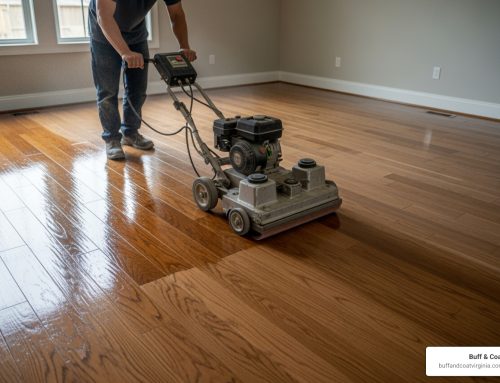
Step 2: The Basic Technique for Buffing a Hardwood Floor
Operating a floor buffer feels awkward initially, but you’ll quickly get the rhythm with a little practice.

Start by securely attaching your 120-grit screening pad to the buffer, making sure it’s centered. Put on all your safety gear and ensure the room is well-ventilated.
Before tackling the main area, test the buffer in an inconspicuous spot like a closet to get comfortable with how the machine handles.
Begin in the corner farthest from your exit. To control movement, slightly raise the handle to move left and lower it to move right. It takes a gentle touch.
Move in overlapping passes side-to-side, overlapping each pass by about one-third of the pad width. This ensures even coverage. The secret is maintaining a steady, consistent pace—never let the buffer sit in one spot while running, as this creates burn marks.
Work systematically across the room, always moving backward toward your exit. Check your screening pad periodically and clean or replace it when it becomes saturated with dust and old finish.
Don’t forget the hand-sanding step for edges and corners the buffer can’t reach. Use 120-150 grit sandpaper on a sanding block to lightly scuff these areas.
Step 3: Clean Up and Apply the New Finish
This final step requires meticulous cleaning and careful application. Rushing now can undo all your previous work.
Vacuum every speck of dust using a powerful shop vacuum, paying special attention to seams and edges. Pro tip: After vacuuming, wait 15 minutes for dust to settle, then vacuum again.
Tacking the floor removes the final microscopic dust particles. Lightly dampen a clean, lint-free cloth with water (for water-based finish) or mineral spirits (for oil-based) and wipe down the entire floor. Avoid commercial tack cloths, which can leave residue.
Prepare your polyurethane finish by stirring well, but don’t shake it, as this creates bubbles. Consider straining water-based finish through a cone filter to catch impurities.

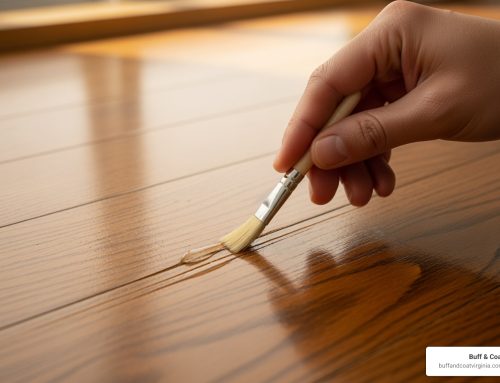
Application technique is key. Start in the far corner and pour a thin bead of finish. Use your T-bar applicator or roller to pull smoothly across the floor with the wood grain. Always maintain a wet edge by working toward your previously applied finish to prevent lap lines.
Apply thin, even coats. Thin coats dry more evenly and are less prone to bubbling. Work in sections, moving backward toward your exit.
Drying time requires patience. With water-based finishes, you can walk on the floor in socks after about an hour (8 hours for oil-based), but wait 24 hours for normal foot traffic. Wait 72 hours to a week before replacing furniture. Always lift, don’t drag, and use furniture pads to protect the new finish.
If you’d prefer professional results without the weekend commitment, we’re here to help. Contact us today for a free, no-obligation inspection and estimate.
Common Issues and Post-Buffing Maintenance
Even careful DIYers can encounter issues. After years of helping Richmond homeowners, I’ve seen that most buffing problems are fixable and should be seen as learning opportunities, not disasters. The key to buffing a hardwood floor successfully is knowing what to watch for and how to address issues as they arise. For more detailed guidance on restoring shine to dull floors, we’ve got a comprehensive article that covers all the bases.
How to Resolve Common Buffing Problems
Swirl marks are a common, frustrating issue. These circular patterns appear when the buffer sits in one spot for too long. To fix them, go over the area again with consistent, overlapping passes, keeping the buffer moving. Use a 120-grit screen and apply light, steady pressure. For stubborn marks, try hand-sanding the area lightly with 150-220 grit sandpaper, then clean thoroughly before finishing.
Uneven finish or patchy areas are usually caused by inconsistent buffing or leftover cleaning residue. If you notice patchy areas before applying the new finish, simply re-buff those spots with proper overlapping technique. If you’ve already applied the finish and it’s dried unevenly, you’ll need to lightly scuff the entire floor again with a 120-grit screen and apply another thin coat.
Residue removal can be a challenge. A hazy or sticky film after buffing indicates that old wax or cleaning products weren’t fully removed during prep, meaning the initial cleaning needed to be more thorough. The solution is to re-clean with a stronger hardwood floor cleaner designed to cut through residue, let the floor dry completely, and tack it carefully before applying finish. If you suspect old wax is the culprit, it might need professional chemical stripping.
Consistent buffer movement, correct pad usage, proper cleaning, and patience are your best friends. When in doubt, test your technique in an inconspicuous area first.
Maintaining Your Floor After Buffing a Hardwood Floor
Proper maintenance will keep your beautiful floors looking spectacular and extend the life of your hard work.
Daily care should become routine. A quick sweep with a soft-bristled broom or a pass with your vacuum (using the hardwood attachment, never the beater bar!) removes tiny particles that can cause scratches.
Weekly cleaning keeps floors fresh. Use a barely damp microfiber mop with a pH-neutral hardwood cleaner. Your mop should feel almost dry to the touch. Avoid Murphy’s Oil Soap, Pledge, or anything with wax, oil, or silicone. Steam cleaners and vinegar are also off-limits.
Protective measures are your floor’s best insurance. Use felt pads under furniture legs to prevent scratches. Area rugs in high-traffic zones like entryways and hallways will protect your finish.
Spill response should be swift. The faster you clean up spills, the less chance moisture has to damage your finish. Keep a clean, dry cloth handy for quick action.
If you have pets, keep their nails trimmed and use waterproof mats under food and water bowls.
With these simple habits, your newly buffed floors will reward you with years of beauty. When it’s time for the next maintenance cycle, our team is here to help.
Frequently Asked Questions about Floor Buffing
After two decades in the business, I’ve heard every question about buffing a hardwood floor. Here are the most common ones.
Will buffing remove deep scratches from my hardwood floor?
Buffing is excellent for surface issues but cannot fix deep damage. Buffing a hardwood floor only addresses scratches and scuffs in the top finish layer. If you can catch your fingernail in the scratch or see bare wood, buffing won’t be enough. Those deeper gouges require full sanding and refinishing to restore the surface. We can help you determine what your floors need during a free inspection.
How often should I buff my hardwood floors?
This common question depends on your floor’s daily traffic. Buffing a hardwood floor isn’t an annual task.
For high-traffic areas like kitchens or main hallways, you might benefit from buffing every 1-2 years. These areas show wear much faster.
Average-use rooms like living rooms or bedrooms can typically go 3-4 years between buffing sessions as part of a regular maintenance schedule. The key is to stay ahead of the wear—it’s easier and more cost-effective to buff when the finish is just starting to look dull rather than waiting until it’s worn through.
Regular buffing significantly extends the time before you’ll need a full sanding and refinishing, saving you money and hassle.
Can I apply a water-based polyurethane over an old oil-based finish?
Yes, you can. Modern water-based polyurethanes are compatible with properly prepared oil-based finishes.
The key is preparation. You need a thorough cleaning and proper “screening” or abrading of the old finish to create a good bonding surface. This is exactly what happens during the buffing a hardwood floor process.
Contaminants like waxes, silicones, or oil soaps on the existing finish will prevent proper adhesion, leading to peeling or bubbling. That’s why we stress using only approved hardwood floor cleaners and avoiding products like Murphy’s Oil Soap or Pledge.
We always recommend testing a small, inconspicuous area first to ensure compatibility and adhesion, especially if you’re unsure what products have been used on the floors over the years.
Conclusion
Admiring your freshly buffed hardwood floors—the way they catch the light and fill the room with a warm glow—is pure DIY satisfaction. Buffing a hardwood floor yourself isn’t just about saving money; it’s about taking control of your home’s beauty. When done properly, buffing can add years to your floor’s life and deliver professional-looking results.
However, not everyone has the time or energy for a DIY project. If you have a packed schedule or simply prefer to leave it to the professionals, we understand.
That’s why we’ve built our reputation on making buffing a hardwood floor stress-free for homeowners. Our signature dust-free buff and coat service takes all the guesswork out of the equation. We bring decades of experience and professional-grade equipment to ensure a flawless finish every time—without you lifting a finger.
Whether you decide to tackle this project yourself or trust it to our experienced team, the important thing is giving your hardwood floors the attention they need. Your floors support your family’s daily life; they deserve some care in return.
Ready to see what your floors can look like with professional care? We’d love to take a look. Schedule a free, no-obligation inspection and get your estimate by contacting us today. We’re proud to serve homeowners throughout Richmond, Glen Allen, and Midlothian, and we can’t wait to help you fall in love with your floors all over again!